pd.set_option('display.max_columns', 100) # 데이터 프레임 출력시 생략 값 출력.
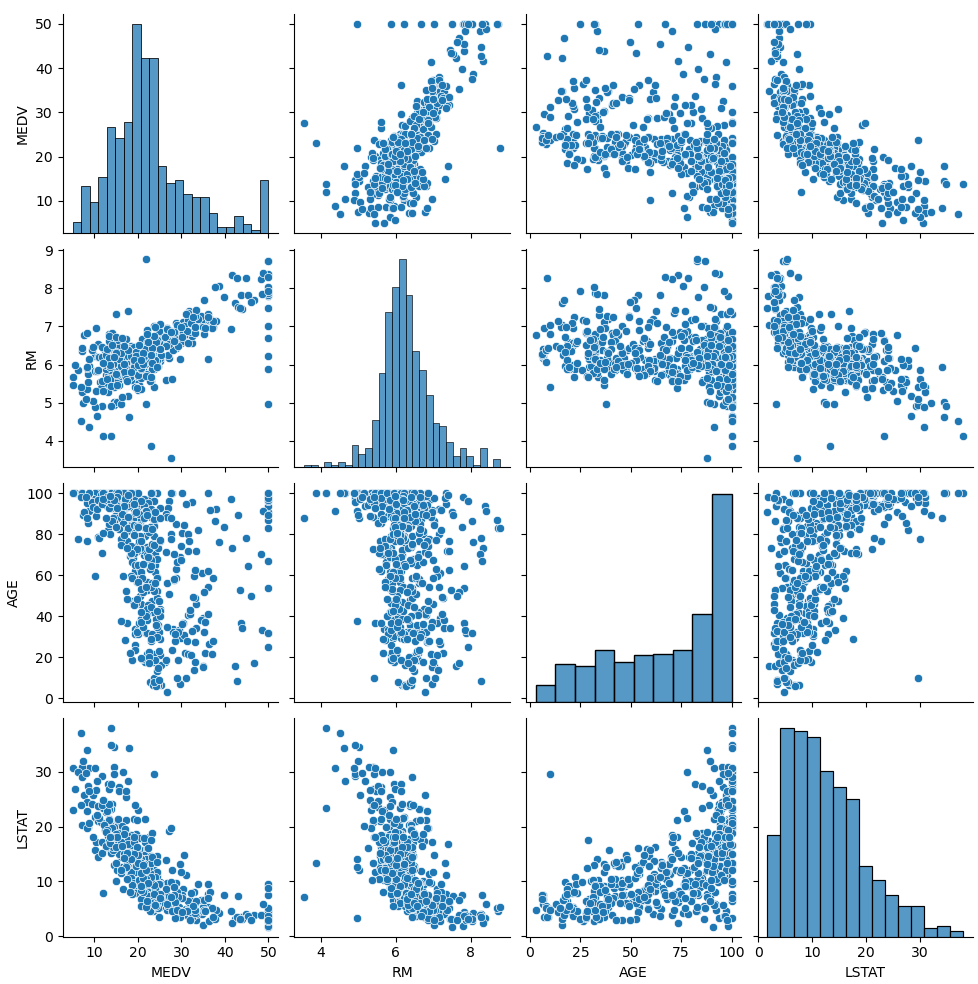
print(df.corr()) # 상관계수 확인
# RM average number of rooms per dwelling. 상관계수 : 0.695360
# AGE proportion of owner-occupied units built prior to 1940. 상관계수 : -0.376955
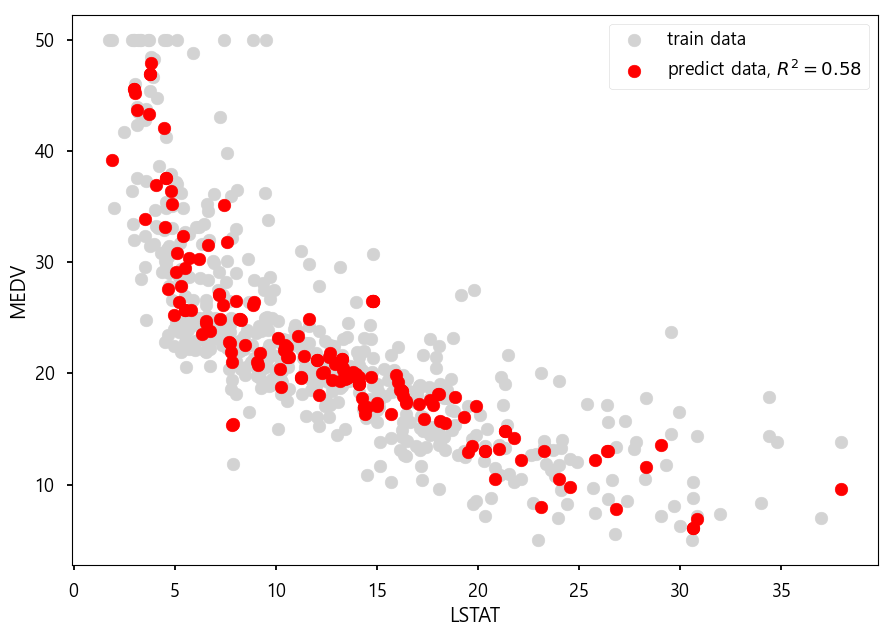
# LSTAT % lower status of the population 상관계수 : -0.737663
배깅(Bagging) - Random Forest : 데이터에서 여러 bootstrap 자료 생성, 모델링 후 결합하여 최종 예측 모형을 만드는 알고리즘 boostrap aggregating의 약어로 데이터를 가방(bag)에 쓸어 담아 복원 추출하여 여러 개의 표본을 만들어 이를 기반으로 각각의 모델을 개발한 후에 결과를 하나로 합쳐 하나의 모델을 만들어 내는 것이다. 배깅을 통해서 얻을 수 있는 효과는 '알고리즘의 안정성'이다. 단일 seed 하나의 값을 기준으로 데이터를 추출하여 모델을 생성해 나는 것보다, 여러 개의 다양한 표본을 사용함으로써 모델을 만드는 것이 모집단을 잘 대표할 수 있게 된다. 또한 명목형 변수 (Categorical data)의 경우 투표(voting) 방식, 혹은 가장 높은 확률값으로 예측 결과값을 합치며 연속형 변수(numeric data)의 경우에는 평균(average)으로 값을 집계한다. 또한 배깅은 병렬 처리를 사용할 수 있는데, 독립적인 데이터 셋으로 독립된 모델을 만들기 때문에 모델 생성에 있어서 매우 효율적이다.
부스팅(Boosting) - XGBoost : 오분류 개체들에 가중치를 적용하여 새로운 분류 규칙 생성 반복 기반 최종 예측 모형 생성 좀 더 알아보자면 Boosting이란 약한 분류기를 결합하여 강한 분류기를 만드는 과정이다. 분류기 A, B, C 가 있고, 각각의 0.3 정도의 accuracy를 보여준다고 하자. A, B, C를 결합하여 더 높은 정확도, 예를 들어 0.7 정도의 accuracy를 얻는 게 앙상블 알고리즘의 기본 원리다. Boosting은 이 과정을 순차적으로 실행한다. A 분류기를 만든 후, 그 정보를 바탕으로 B 분류기를 만들고, 다시 그 정보를 바탕으로 C 분류기를 만든다. 그리고 최종적으로 만들어진 분류기들을 모두 결합하여 최종 모델을 만드는 것이 Boosting의 원리다. 대표적인 알고리즘으로 에이다부스트가 있다. AdaBoost는 Adaptive Boosting의 약자이다. Adaboost는 ensemble-based classifier의 일종으로 weak classifier를 반복적으로 적용해서, data의 특징을 찾아가는 알고리즘.
- anaconda prompt
pip install xgboost
*xgboost1.py
# RandomForest vs xgboost
import pandas as pd
from sklearn import datasets
from sklearn.model_selection import train_test_split
from sklearn.ensemble import RandomForestClassifier
from sklearn import metrics
import numpy as np
import xgboost as xgb       # pip install xgboost

if __name__ == '__main__':
    iris = datasets.load_iris()
    print('아이리스 종류 :', iris.target_names)
    print('데이터 열 이름 :', iris.feature_names)

    # iris data로 Dataframe
    data = pd.DataFrame(
        {
            'sepal length': iris.data[:, 0],
            'sepal width': iris.data[:, 1],
            'petal length': iris.data[:, 2],
            'petal width': iris.data[:, 3],
            'species': iris.target
        }
    )
    print(data.head(2))
    '''
           sepal length  sepal width  petal length  petal width  species
    0           5.1          3.5           1.4          0.2        0
    1           4.9          3.0           1.4          0.2        0
    '''

    x = data[['sepal length', 'sepal width', 'petal length', 'petal width']]
    y = data['species']

    # 테스트 데이터 30%
    x_train, x_test, y_train, y_test = train_test_split(x, y, test_size=0.3, random_state=123)

    # 학습 진행
    model = RandomForestClassifier(n_estimators=100)  # RandomForestClassifier - Bagging 방법 : 병렬 처리
    model = xgb.XGBClassifier(booster='gbtree', max_depth=4, n_estimators=100) # XGBClassifier - Boosting : 직렬처리
    # 속성 - booster: 의사결정 기반 모형(gbtree), 선형 모형(linear)
    #    - max_depth [기본값: 6]: 과적합 방지를 위해서 사용되며 CV를 사용해서 적절한 값이 제시되어야 하고 보통 3-10 사이 값이 적용된다.

    model.fit(x_train, y_train)

    # 예측
    y_pred = model.predict(x_test)
    print('예측값 : ', y_pred[:5])
    # 예측값 :  [1 2 2 1 0]

    print('실제값 : ', np.array(y_test[:5]))
    # 실제값 :  [1 2 2 1 0]

    print('정확도 : ', metrics.accuracy_score(y_test, y_pred))
    # 정확도 :  0.9333333333333333
import xgboost as xgb
xgb.XGBClassifier(booster='gbtree', max_depth=, n_estimators=) : XGBoost 분류 - Boosting(직렬처리) booster : 의사결정 기반 모형(gbtree), 선형 모형(linear) max_depth : 과적합 방지를 위해서 사용되며 CV를 사용해서 적절한 값이 제시되어야 하고 보통 3-10 사이 값이 적용됨.
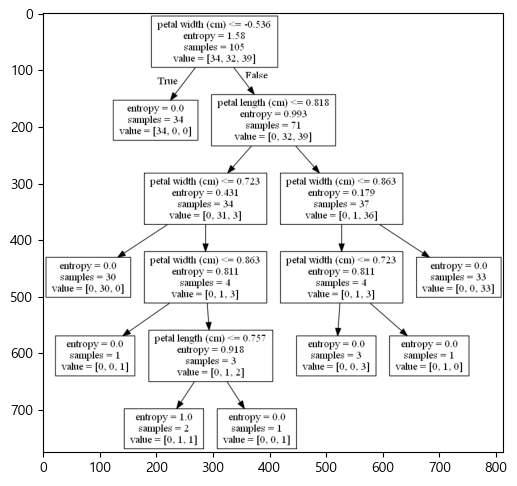
# 시각화 - graphviz 툴을 사용
import collections

dot_data = tree.export_graphviz(model, feature_names=label_names, out_file=None,\
                                filled = True, rounded=True)
graph = pydotplus.graph_from_dot_data(dot_data)
colors = ('red', 'orange')
edges = collections.defaultdict(list) # list type 변수

for e in graph.get_edge_list():
    edges[e.get_source()].append(int(e.get_destination()))

for e in edges:
    edges[e].sort()
    for i in range(2):
        dest = graph.get_node(str(edges[e][i]))[0]
        dest.set_fillcolor(colors[i])

graph.write_png('tree.png') # 이미지 저장

import matplotlib.pyplot as plt

img = plt.imread('tree.png')
plt.imshow(img)
plt.show()
* tree2_iris.py
...

# 의사결정 나무 모델
from sklearn.tree import DecisionTreeClassifier
model = DecisionTreeClassifier(criterion='entropy', max_depth=5)

...
...
# 트리의 특성 중요도 : 전체 트리 결정에 각 특성이 어느정도 중요한지 평가
print('특성 중요도 : \n{}'.format(model.feature_importances_))

def plot_feature_importances(model):
    n_features = x.shape[1] # 4
    plt.barh(range(n_features), model.feature_importances_, align='center')
    #plt.yticks(np.range(n_features), iris.featrue_names[2:4])
    plt.xlabel('특성중요도')
    plt.ylabel('특성')
    plt.ylim(-1, n_features)

plot_feature_importances(model)
plt.show()
# graphviz
from sklearn import tree
from io import StringIO
import pydotplus

dot_data = StringIO() # 파일 흉내를 내는 역할
tree.export_graphviz(model, out_file = dot_data,\
                     feature_names = iris.feature_names[2:4])
graph = pydotplus.graph_from_dot_data(dot_data.getvalue())
graph.write_png('tree2.png')

import matplotlib.pyplot as plt

img = plt.imread('tree2.png')
plt.imshow(img)
plt.show()
from sklearn.preprocessing import OneHotEncoder
x = '1,2,3,4,5'
x = x.split(',')
x = np.array(x)
x = x[:, np.newaxis]
'''
[['1']
 ['2']
 ['3']
 ['4']
 ['5']]
'''

one_hot = OneHotEncoder(categories = 'auto')
x = one_hot.fit_transform(x).toarray()
print(x)
'''
[[1. 0. 0. 0. 0.]
 [0. 1. 0. 0. 0.]
 [0. 0. 1. 0. 0.]
 [0. 0. 0. 1. 0.]
 [0. 0. 0. 0. 1.]]
'''
y = np.array([1,3,5,7,9])

model = GaussianNB().fit(x, y)
pred = model.predict(x)
print(pred) # [1 3 5 7 9]
print('acc :', metrics.accuracy_score(y, pred)) # acc : 1.0
* bayes3_text.py
# 나이브베이즈 분류모델로 텍스트 분류
from sklearn.datasets import fetch_20newsgroups

data = fetch_20newsgroups()
print(data.target_names)

categories = ['talk.religion.misc', 'soc.religion.christian',
              'sci.space', 'comp.graphics']

train = fetch_20newsgroups(subset='train', categories=categories)
test = fetch_20newsgroups(subset='test', categories=categories)
print(train.data[5])  # 데이터 중 대표항목

from sklearn.feature_extraction.text import TfidfVectorizer
from sklearn.naive_bayes import MultinomialNB
from sklearn.pipeline import make_pipeline

# 각 문자열의 콘텐츠를 숫자벡터로 전환
model = make_pipeline(TfidfVectorizer(), MultinomialNB())  # 작업을 연속적으로 진행
model.fit(train.data, train.target)
labels = model.predict(test.data)

from sklearn.metrics import confusion_matrix
import matplotlib.pyplot as plt
import seaborn as sns

mat = confusion_matrix(test.target, labels)  # 오차행렬 보기
sns.heatmap(mat.T, square=True, annot=True, fmt='d', cbar=False,
            xticklabels=train.target_names, yticklabels=train.target_names)
plt.xlabel('true label')
plt.ylabel('predicted label')
plt.show()

# 하나의 문자열에 대해 예측한 범주 변환용 유틸 함수 작성
def predict_category(s, train=train, model=model):
    pred = model.predict([s])
    return train.target_names[pred[0]]

print(predict_category('sending a payload to the ISS'))
print(predict_category('discussing islam vs atheism'))
print(predict_category('determining the screen resolution'))

# 참고 도서 : 파이썬 데이터사이언스 핸드북 ( 출판사 : 위키북스)
# 학습한 데이터의 결과가 신뢰성이 있는지 확인하기 위해 교차검증 p221
from sklearn import model_selection
cross_vali = model_selection.cross_val_score(model, wh, label, cv=3)
# k ford classification
# train 7, test 3 => train으로 3등분 하여 재검증
# 검증 학습 학습
# 학습 검증 학습
# 학습 학습 검증
print('각각의 검증 결과:', cross_vali)          # [0.96754065 0.96400072 0.96783871]
print('평균 검증 결과:', cross_vali.mean())    # 0.9664600275737195
: 각각의 데이터에 대한 잔차 제곱합이 최소가 되는 추세선을 만들고, 이를 통해 독립 변수가 종속변수에 얼마나 영향을 주는지 인과관계를 분석.
: 독립변수 - 연속형, 종속변수 - 연속형.
: 두 변수는 상관관계 및 인과관계가 있어야한다. (상관계수 > 0.3)
:정량적인 모델 생성.
- 기계 학습(지도학습) : 학습을 통해 모델 생성 후, 새로운 데이터에 대한 예측 및 분류
선형회귀 Linear Regression
최소 제곱법(Least Square Method)
Y = a + b * X
선형회귀분석의 기존 가정 충족 조건
선형성 : 독립변수(feature)의 변화에 따라 종속변수도 일정 크기로 변화해야 한다.
정규성 : 잔차항이 정규분포를 따라야 한다.
독립성 : 독립변수의 값이 서로 관련되지 않아야 한다.
등분산성 : 그룹간의 분산이 유사해야 한다. 독립변수의 모든 값에 대한 오차들의 분산은 일정해야 한다.
다중공선성 : 다중회귀 분석 시 3 개 이상의 독립변수 간에 강한 상관관계가 있어서는 안된다.
- 최소 제곱해를 선형 행렬 방정식으로 얻기
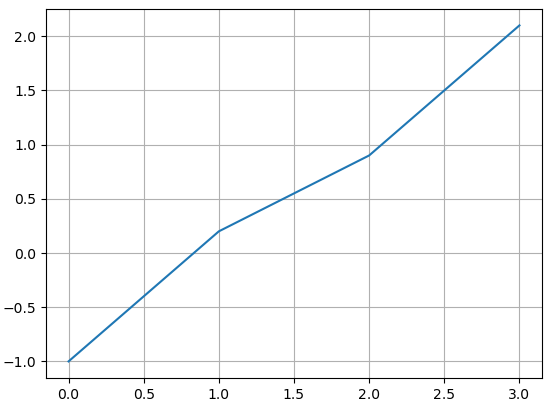
* linear_reg1.py
import numpy.linalg as lin
import numpy as np
import matplotlib.pyplot as plt

x = np.array([0, 1, 2, 3])
y = np.array([-1, 0.2, 0.9, 2.1])

plt.plot(x, y)
plt.grid(True)
plt.show()
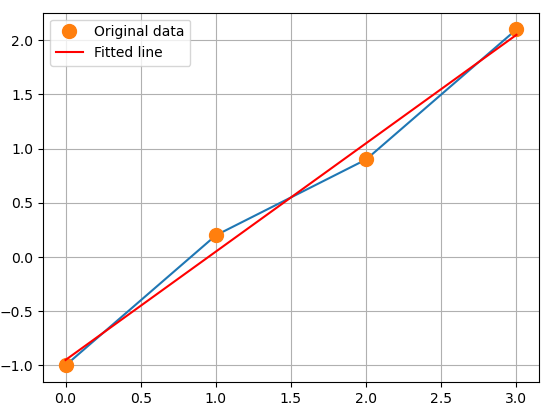
A = np.vstack([x, np.ones(len(x))]).T
print(A)
'''
[[0. 1.]
 [1. 1.]
 [2. 1.]
 [3. 1.]]
'''

# y = mx + c
m, c = np.linalg.lstsq(A, y, rcond=None)[0]
print('기울기 :', m, ' y절편:', c) # 기울기 : 0.9999999999999997   y절편 : -0.949999999999999

plt.plot(x, y, 'o', label='Original data', markersize=10)
plt.plot(x, m*x + c, 'r', label='Fitted line')
plt.legend()
plt.show()
print("이전 작업 진행")
class Tiger:
    data = '호랑이 세상'

    def cry(self):
        print('호랑이 울음')
    def eat(self):
        print('고기 먹음')

class Lion:
    data = '사자 세상'

    def cry(self):
        print('사자 울음')

    def hobby(self):
        print('사자 낮잠')

class Liger(Tiger, Lion): # 먼저 명시한 부모를 먼저 인식
    pass

aa = Liger()
aa.cry()        # 호랑이 울음
aa.eat()        # 고기 먹음
aa.hobby()      # 사자 낮잠
print(aa.data)  # 호랑이 세상
print()

class Liger2(Lion, Tiger):
    data = 'Liger2 멤버 변수'

    def play(self):
        print("Liger2 고유 메소드")
        self.hobby()
        super().hobby()
        print(self.data)
        print(super().data)
bb = Liger2()
bb.cry()       # 사자 울음
bb.eat()       # 고기 먹음
bb.hobby()     # 사자 낮잠
print(bb.data) # Liger2 멤버 변수
bb.play()
# Liger2 고유 메소드
# 사자 낮잠
# 사자 낮잠
# Liger2 멤버 변수
# 사자 세상
class Animal:
    def move(self):
        pass

class Dog(Animal):
    name = '개'

    def move(self):
        print('개가 낮에 돌아다님')

class Cat(Animal):
    name = '고양이'

    def move(self):
        print('고양이가 밤에 돌아다님')

class Wolf(Dog, Cat):
    pass

class Fox(Cat, Dog):
    def move(self):
        print('여우가 돌아다님(오버라이딩)')

    def foxMove(self):
        print('여우 고유 메소드')
dog = Dog()
cat = Cat()
wolf = Wolf()
fox = Fox()

anis = [dog, cat, wolf, fox]
for a in anis:
    a.move()
# 개가 낮에 돌아다님
# 고양이가 밤에 돌아다님
# 개가 낮에 돌아다님
# 여우가 돌아다님(오버라이딩)
21. 추상클래스
추상클래스 : 추상 메소드를 가지는 클래스. 추상 메소드: 자식 클래스에서 부모의 추상메소드를 일반 메소드로 반드시 오버라이딩 하도록 강요.
* test25_abstract
from abc import *

class TestClass(metaclass = ABCMeta): # 추상 클래스
    @abstractmethod
    def abcMethod(self):              # 추상 메소드
        pass

    def normalMethod(self):           # 일반 메소드
        print('일반 메소드')

tt = TestClass()   # TypeError: Can't instantiate abstract class TestClass with abstract methods abcMethod
                   # 추상클래스가 추상메소드를 가질 경우 인스턴스 생성 시 error 발생.
                   # 추상클래스가 추상메소드를 가지지 않을 경우 인스턴스 생성 가능.
class Child1(TestClass): # 추상 클래스를 상속 받을 경우 추상메소드를 오버라이드 하지않을 경우 error 발생
    name = 'Child1'

    def abcMethod(self):
        print('Child1 추상 메소드를 오버라이딩하여 일반 메소드 생성')

# TypeError: Can't instantiate abstract class Child1 with abstract methods abcMethod
c1 = Child1()
c1.abcMethod()       # Child1 추상 메소드를 오버라이딩하여 일반 메소드 생성
c1.normalMethod()    # 일반 메소드
class Child2(TestClass):
    name = 'Child2'

    def abcMethod(self):
        print('Child2 추상 메소드를 오버라이딩하여 일반 메소드 생성')
        print('다른 클래스의 abcMethod와 이름은 같으나 다른 기능을 수행.')

    def normalMethod(self):
        print('부모의 normalMethod를 오버라이딩. 부모 메소드와 다른 역할 수행을 위해.')

c2 = Child2()
c2.abcMethod()      # Child2 추상 메소드를 오버라이딩하여 일반 메소드 생성
                    # 다른 클래스의 abcMethod와 이름은 같으나 다른 기능을 수행.
c2.normalMethod()   # 부모의 normalMethod를 오버라이딩. 부모 메소드와 다른 역할 수행을 위해.
print()
다형성 구현
my = c1
my.abcMethod()      # 1
                    #Child1 추상 메소드를 오버라이딩하여 일반 메소드 생성
my = c2
my.abcMethod()      # 1과 동일한 명령문이나 기능은 다름.
                    #Child2 추상 메소드를 오버라이딩하여 일반 메소드 생성
                    #다른 클래스의 abcMethod와 이름은 같으나 다른 기능을 수행.
def divide(a, b):
    return a / b

c = divide(5, 2)
#c = divide(5, 0) # ZeroDivisionError: division by zero
print(c)
print()

try:
    c = divide(5, 2)
    #c = divide(5, 0)
    print(c)

    aa = [1, 2]
    print(aa[0])
    print(aa[1])
    #print(aa[2]) # IndexError: list index out of range

    f = open('c:/abc.txt') # FileNotFoundError: [Errno 2] No such file or directory: 'c:/abc.txt'

except ZeroDivisionError:
    print('두번째 인자에 0을 주지마세요')

except IndexError as e:
    print('Index Error : ', e)
except Exception as err:
    print("error 발생 : ", err)
finally:
    print('에러 유무에 관계없이 반드시 수행됨')

print('프로그램 종료')
try:
    # 저장
    with open('ftest3.txt', mode = 'w', encoding = 'utf-8') as ff1:
        ff1.write('파이썬 문서 저장\n')
        ff1.write('내용\n')
        ff1.write('with문 사용으로 close() 하지않음\n')
    # 읽기
    with open('ftest3.txt', mode = 'r', encoding = 'utf-8') as ff2:
        print(ff2.read())
except Exception as e2:
    print('에러 발생', e2)
- 피클링 : 복합 개체 처리(i/o)
import pickle

try:
    dicData = {'tom':'111-1111', 'james':'222-2222'}
    listData = ['마우스', '키보드']
    tupleData = (dicData, listData) # 복합객체

    with open('hi.dat', 'wb') as fobj:
        pickle.dump(tupleData, fobj)
        pickle.dump(listData, fobj)
    print('객체를 파일로 저장하기 성공')
    print('객체 읽기')
    with open('hi.dat', 'rb') as fobj2:
        a, b = pickle.load(fobj2)
        print(a) # {'tom': '111-1111', 'james': '222-2222'}
        print(b) # ['마우스', '키보드']
        c = pickle.load(fobj2)
        print(c)
except Exception as e3:
    print('error : ' + e3)
* test28_file
- 동 이름으로 우편번호와 주소 출력
try:
    dong = input('동이름 입력 : ')
    print(dong)
    with open(r'zipcode.txt', mode = 'r', encoding = 'euc-kr') as f:
        #print(f.read())
        line = f.readline()
        while line:
            lines = line.split('\t') # tab으로 구분
            #print(lines)
            if lines[3].startswith(dong): # 입력된 동 이름으로 시작되는 주소만 처리
                print('[' + lines[0] + '] '+ lines[1] + ' '+ lines[2] + \
                      ' '+ lines[3] + ' '+ lines[4])
            line = f.readline() # readline이 없을 때 까지 수행

except Exception as e:
    print('err',e)
        # Connect Events
        self.btnCalc.id  = 1 # id 부여
        self.btnClear.id = 2
        self.btnExit.id  = 3
        self.btnCalc.Bind( wx.EVT_BUTTON, self.OnCalcProcess )
        self.btnClear.Bind( wx.EVT_BUTTON, self.OnCalcProcess )
        self.btnExit.Bind( wx.EVT_BUTTON, self.OnCalcProcess )

    def __del__( self ):
        pass


    # Virtual event handlers, overide them in your derived class
    def OnCalcProcess( self, event ):
        sel_id = event.GetEventObject().id # event 발생 객체의 id를 get
        #print(sel_id)
        if sel_id == 1: # 계산 버튼을 누를 경우
            op = self.rdoOp.GetStringSelection() # 선택된 라디오 버튼의 문자열 get
            #print(op)
            num1 = self.txtNum1.GetValue()
            num2 = self.txtNum2.GetValue()

            if num1 == '' or num2 == '':
                wx.MessageBox('값을 입력하시오', '알림', wx.OK)
                return
            try:
                result = eval(num1 + op + num2)
            except Exception as e:
                wx.MessageBox('연산오류', '알림', wx.OK)
                return

            self.staResult.SetLabel(str(result))
        elif sel_id == 2: # 초기화
            self.txtNum1.SetLabel('')
            self.txtNum2.SetLabel('')
            self.staResult.SetLabel('')
            self.rdoOp.SetSelection(0)
            self.txtNum1.SetFocus()     # UX/UI
        elif sel_id == 3:
            dlg = wx.MessageDialog(self, '정말 종료할까요?', '알림', wx.YES_NO) # MessageDialog style 입력
            temp = dlg.ShowModal() # MessageDialog 창 발생
            if temp == wx.ID_YES:  # YES 버튼을 누를 경우
                dlg.Destroy()      # MessageDialog창 닫기
                self.Close()       # Frame 닫기

if __name__ == '__main__':
    app = wx.App()
    MyFrame1(None).Show()
    app.MainLoop()
25. SQLite
: 개인용 DB SQLite3 : Python에 기본 설치됨
: 환경변수 path에 추가 : C:\anaconda3\Library\bin
* test33_sqlite
import sqlite3
print(sqlite3.version_info)

#conn = sqlite3.connect('example.db')
conn = sqlite3.connect(':memory:') # ram에 DB 생성 - 테스트용으로 연습할 때

try:
    cur = conn.cursor()

    cur.execute("create table if not exists friends(name text, phone text)")

    cur.execute("insert into friends values('홍길동', '111-1111')")
    cur.execute("insert into friends values(?, ?)", ('tom', '222-2222'))
    conn.commit()
    cur.execute("select * from friends")
    for f in cur:
        print(f[0] + " " + f[1])

except Exception as e:
    print(e)
    conn.rollback()
finally:
    conn.close()
    # 자료 수정
    sql = "update sangdata set sang=%s, su=%s, dan=%s where code=%s"
    sql_data = '깡', 7, 1000, 12
    cou = cursor.execute(sql, sql_data) # 성공하면 n, 실패시 0
    print('성공건수 ',cou)
    conn.commit()
    # 자료삭제
    code = '10'
    sql = "delete from sangdata where code =" + code # 비권장
    cursor.execute(sql)
    sql = "delete from sangdata where code = %s" # 권장 1
    cursor.execute(sql, (code,)) # 튜플
    sql = "delete from sangdata where code = '{0}'".format(code) # 권장 2
    cou = cursor.execute(sql)
    print('성공건수 ',cou)
    conn.commit()
    # 자료읽기 1
    sql = "select code, sang, su, dan from sangdata"
    cursor.execute(sql)    # DB의 자료를 읽어 cursor 객체가 그 결과를 기억

    for data in cursor.fetchall():
        #print(data)
        print('%s %s %s %s'%data)
    # 자료읽기 2
    for r in cursor:
        print(r[0], r[1], r[2], r[3])
    # 자료읽기 3
    for (code, sang, su, dan) in cursor:
        print(code, sang, su, dan)

    for (a, b, c, d) in cursor:
        print(a, b, c, d)
except MySQLdb.connections.Error as err:
    print('db err' + str(err))
except Exception as e:
    print('err' + str(e))
finally:
    cursor.close()
    conn.close()
- 키보드로 부서번호를 입력받아 해당 부서에 근무하는 직원 출력
* test35_db
import MySQLdb
import sys

config = {
    'host':'127.0.0.1',
    'user':'root',
    'password':'123',
    'database':'test',
    'port':3306,
    'charset':'utf8',
    'use_unicode':True
}

try:
    conn = MySQLdb.connect(**config)
    cursor = conn.cursor()

    buser_no = input('부서번호 입력 : ')
    sql = """
    select jikwon_no, jikwon_name, buser_num, jikwon_jik, jikwon_pay
    from jikwon
    where buser_num ={0}
    """.format(buser_no)

    cursor.execute(sql)
    datas = cursor.fetchall()

    if len(datas) == 0:
        print(str(buser_no)+ '번 부서는 없습니다.')
        sys.exit()

    for d in datas:
        print(d[0], d[1], d[2], d[3])

    print('인원수 : ' + str(len(datas)))

except Exception as e:
    print('err', e)

finally:
    cursor.close()
    conn.close()
# Virtual event handlers, overide them in your derived class
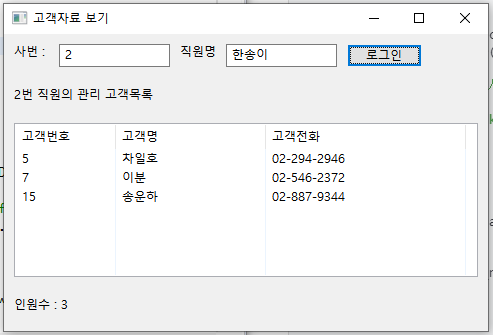
def OnLogin( self, event ):
if self.txtNo.GetValue() == '': # 사번을 입력안할 경우 팝업 발생
wx.MessageBox('사번입력', '알림', wx.OK)
self.txtNo.SetFocus()
return
if self.txtName.GetValue() == '': # 사번을 입력안할 경우 팝업 발생
wx.MessageBox('직원명 입력', '알림', wx.OK)
self.txtNo.SetFocus()
return
self.LoginCheck()
    def LoginCheck(self):
        try:
            conn = MySQLdb.connect(**config)
            cursor = conn.cursor()
            no = self.txtNo.GetValue()
            name = self.txtName.GetValue()
            #print(no, name)

            sql ="""
            select count(*) from jikwon
            where jikwon_no ='{0}' and jikwon_name ='{1}'
            """.format(no, name)

            cou = cursor.execute(sql)
            count = cursor.fetchone()[0]
            #print(count) # 1
            if count == 0:
                wx.MessageBox('로그인 실패', '알림', wx.OK)
                return
            else:
                self.staMsg.SetLabelText(no + '번 직원의 관리 고객목록')
                self.DisplayData(no) # 직원자료 출력 메소드 호출

        except Exception as e:
            print('LoginCheck err',e)
        finally:
            cursor.close()
            conn.close()
    def DisplayData(self, no):
        try:
            conn = MySQLdb.connect(**config)
            cursor = conn.cursor()

            sql = """
            select gogek_no, gogek_name, gogek_tel
            from gogek
            where gogek_damsano = {}
            """.format(no)

            cou = cursor.execute(sql)
            datas = cursor.fetchall()
            #print(datas)
            self.lstGogek.DeleteAllItems() # list control 초기화
            for d in datas:
                i = self.lstGogek.InsertItem(1000, 0) # List Control 최대 행수 입력
                self.lstGogek.SetItem(i, 0, str(d[0]))
                self.lstGogek.SetItem(i, 1, d[1])
                self.lstGogek.SetItem(i, 2, d[2])
            self.staCount.SetLabelText('인원수 : ' + str(len(datas)))
        except Exception as e:
            print('DisplayData err',e)
        finally:
            cursor.close()
            conn.close()


if __name__ == '__main__':
    app = wx.App()
    MyGogek(None).Show()
    app.MainLoop()
- Socket : TCP/IP Protocol(통신규약)의 프로그래머 인터페이스를 모듈로 지원
* socket_test
import socket

print(socket.getservbyname('http','tcp'))   # http port 80
print(socket.getservbyname('telnet','tcp')) # http port 23
print(socket.getservbyname('ftp','tcp'))    # http port 21
print(socket.getservbyname('smtp','tcp'))   # http port 25
print(socket.getservbyname('pop3','tcp'))   # http port 110

print()
print(socket.getaddrinfo('www.naver.com', 80, proto=socket.SOL_TCP))
# [(<AddressFamily.AF_INET: 2>, 0, 6, '', ('125.209.222.142', 80)), (<AddressFamily.AF_INET: 2>, 0, 6, '', ('223.130.195.200', 80))]
print(socket.getaddrinfo('www.daum.net', 80, proto=socket.SOL_TCP))
* soc1_server
# 접속상태 확인을 위한 단순 Echo Server - client의 요청에 1회만 반응

from socket import *

serverSock = socket(AF_INET, SOCK_STREAM) # socket(socket 종류, socket 유형)
serverSock.bind(('127.0.0.1', 9999))
serverSock.listen(1)                      # TCP 리스너 설정

print('server start')

conn, addr = serverSock.accept()
print('client addr :', addr)
print('from client message : ', conn.recv(1024).decode())
# 클라이언트로 부터 바이트 단위 문자열로 수신된 내용 출력
conn.close()
serverSock.close()
* soc1_client
# 1회 접속용 클라이언트
from socket import *

clientSock = socket(AF_INET, SOCK_STREAM)
clientSock.connect(('127.0.0.1', 9999))
clientSock.sendall('안녕 반가워'.encode(encoding='utf_8', errors='strict'))
clientSock.close()
* soc2_server
# 서버 서비스 계속 유지
import socket
import sys

HOST = ''
PORT = 8888

serverSock = socket.socket(socket.AF_INET, socket.SOCK_STREAM)

try:
    serverSock.bind((HOST, PORT))
    print('server start')
    serverSock.listen(5) # 클라이언트 접속 대기. 최대 동시 접속수는 1 ~ 5

    while True:
        conn,addr = serverSock.accept() # 클라이언트 접속 승인
        print('client info : ', addr[0], addr[1])
        print(conn.recv(1024).decode()) # 클라이언트가 전송한 메세지 수신 후 출력

        # 전송
        conn.send('from server : ' + str(addr[1]) + 'ㅁㅁㅁ'.encode('utf_8'))
except socket.error as err:
    print('socket error : ', err)
except Exception as e:
    print('error : ', e)
finally:
    serverSock.close()
- process : 실행 중인 응용프로그램을 의미, 프로세스 단위로 별도의 메모리를 사용
from subprocess import *

Popen('calc.exe')
Popen('notepad.exe')
- thread : Light weight process 라고도 함. 메인 프로세스(스레드)와 병렬적으로 수행되는 단위 프로그램. 스레드 단위로 함수나 메소드를 수행 가능.
* th1
import time

def run(id):
    for i in range(1, 11):
        print('id:{} -> {}'.format(id, i))
        time.sleep(0.5)
1. thread를 사용하지 않은 경우
run(1) # 순차적으로 호출되므로 순차적으로 처리됨
run(2)
2. thread를 사용한 경우 : 스레드 스케쥴러에 의해 랜덤하게 스레드 처리가 됨
import threading

th1 = threading.Thread(target=run, args = ('일')) # 사용자 정의 스레드 생성
th2 = threading.Thread(target=run, args = ('이'))
th1.start() # 스레드 수행 시작
th2.start()
th1.join()  # 사용자 정의 스레드가 종료될때까지 메인 스레드 대기 시킴
th2.join()

print('메인 프로그램 종료') # 메인 스레드에 의해 메인 모듈이 실행(기본 값)
* th2
스레드를 이용하여 날짜 및 시간 출력
import time
import threading

now = time.localtime()
#print(now)
print('현재는 {0}년 {1}월 {2} 일 {3} 시 {4} 분 {5} 초'.format(now.tm_year, now.tm_mon, \
                                                     now.tm_mday ,now.tm_hour,now.tm_min,now.tm_sec))

def cal_show():
        now = time.localtime()
        print('현재는 {0}년 {1}월 {2} 일 {3} 시 {4} 분 {5} 초'.format(now.tm_year, now.tm_mon, \
                                                     now.tm_mday ,now.tm_hour,now.tm_min,now.tm_sec))

def myRun():
    while True:
        now2 = time.localtime()
        if now2.tm_min == 57:
            break
        cal_show()
        time.sleep(1)

th = threading.Thread(target=myRun)
th.start()
th.join()
class MyThread(threading.Thread):
    def run(self):
        for i in range(1, 10):
            print('id{} --> {}'.format(self.getName(), i))
            time.sleep(0.1)

ths = []
for i in range(2):
    th = MyThread()
    th.start()
    ths.append(th)

for th in ths:
    th.join()

print('프로그램 종료')
- 스레드간 공유자원 값 충돌 방지 - 동기화
* th3
import threading, time
g_count = 0 # 전역변수는 자동으로 스레드의 공유자원이 됨

lock = threading.Lock()

def threadCount(id, count):
    global g_count
    for i in range(count):
        lock.acquire() # 두 개 이상의 스레드 공유 자원 충돌방지. lock을 걸어 다른 스레드 수행대기.
        print('id %s => count : %s, g_count : %s'%(id, i, g_count))
        g_count += 1
        lock.release() # lock을 해제

for i in range(1, 6):
    threading.Thread(target=threadCount, args =(i, 5)).start()

time.sleep(2)
print('final g_count : ', g_count)
print('finish process')
- 스레드의 활성화/비활성화
* th4
import threading, time
bread_plate = 0 # 빵 접시 - 공유자원
lock = threading.Condition()

class Maker(threading.Thread): # 빵 생성자
    def run(self):
        global bread_plate

        for i in range(30):
            lock.acquire() # 공유자운 충동방지

            while bread_plate >=10:
                print('빵 생산 초과로 대기')
                lock.wait() # 쓰레드 비활성화

            bread_plate += 1
            print('빵 생산 후 접시에 담기 : ', bread_plate)

            lock.notify() # 쓰레드 활성화
            lock.release()
            time.sleep(0.05)

class Eater(threading.Thread): # 빵 소비자
    def run(self):
        global bread_plate

        for i in range(30):
            lock.acquire() # 공유자원 충동방지

            while bread_plate <1:
                print('빵이 없어 대기')
                lock.wait() # 쓰레드 비활성화

            bread_plate -= 1
            print('빵 소비 후 접시의 빵 수 : ', bread_plate)

            lock.notify() # 쓰레드 활성화
            lock.release()
            time.sleep(0.07)
mak = []
con = []
for i in range(5): # 빵 생산자 수
    mak.append(Maker())

for i in range(5): # 빵 소비자 수
    con.append(Eater())

for th1 in mak:
    th1.start()

for th2 in con:
    th2.start()

for th1 in mak:
    th1.join()

for th2 in con:
    th2.join()

print('process 끝')
29. 멀티 쓰레드 채팅 프로그램
: socket, thread 사용
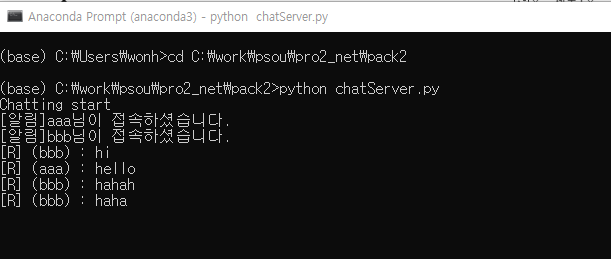
* chatServer (서버)
import socket
import threading

ss = socket.socket(socket.AF_INET, socket.SOCK_STREAM) # 서버 소켓 생성
ss.bind(('127.0.0.1', 5000))                           # ip에 연결
ss.listen(5)                                           # 동접속자 수 최대 5로 리스너 설정
print('Chatting start')
users = []

def ChatUser(conn):
    name = conn.recv(1024)
    data = '[알림]' + name.decode('utf_8') + '님이 접속하셨습니다.'
    print(data)

    try:
        for p in users:                                # 다른 클라이언트에도 접속 메시지 send
            p.send(data.encode('utf_8'))

        while True:                                    # 채팅 진행
            msg = conn.recv(1024)                      # 수신한 메세지
            data = '('+name.decode('utf_8') + ') : ' + msg.decode() # 송부자 + 메세지
            print('[R] '+data)
            for p in users:                            # 다른 클라이언트에도 메시지 send
                p.send(data.encode('utf_8'))
    except Exception as e:                             # 접속 종료 시
        users.remove(conn)                             # 접속 종료 시 list에 conn 제거
        data = '[알림]' + name.decode('utf_8') + '님이 접속을 종료하셨습니다.'
        print(data)
        print(e)
        if users:                                      # 다른 클라이언트에도 접속 종료 메시지 send
            for p in users:
                p.send(data.encode('utf_8'))
        else:
            print('exit')

while True:
    conn, addr = ss.accept()                           # 소켓 접속 및 대기. 클라이언트 접속 시 값 리턴
    users.append(conn)                                 # 접속 시 list에 conn 추가
    th = threading.Thread(target=ChatUser, args = (conn, )) # 접속자 수 만큼 쓰레드 생성
    th.start()
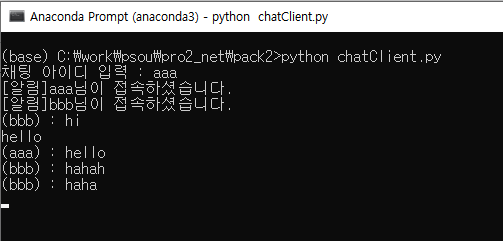
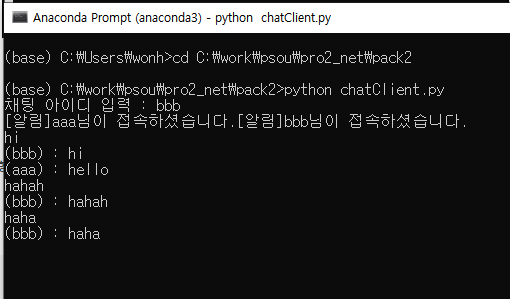
*chatClient (클라이언트)
import socket
import threading
import sys
def Handle(socket):
    while True:
        data = socket.recv(1024)
        if not data: continue
        print(data.decode('utf_8'))                    # 파이썬 표준 출력은 버퍼링 된다.
        #print(data.decode('utf_8', flush=true))

sys.stdout.flush()                                     # 표준 입출력 버퍼 비움

cs = socket.socket(socket.AF_INET, socket.SOCK_STREAM) # 클라이언트 소켓 생성
cs.connect(('127.0.0.1', 5000))                        # 해당 ip에 접속

name = input('채팅 아이디 입력 : ')
cs.send(name.encode('utf_8'))                          # 접속 id send

th = threading.Thread(target=Handle, args = (cs,))     # 쓰레드 생성
th.start()

while True:
    msg = input()                                      # 채팅 메세지 입력
    sys.stdout.flush()

    if not msg:continue
    cs.send(msg.encode('utf_8'))                       # msg가 있을 경우 msg send

cs.close()
30. pool
GIL(Global Interpreter Lock) 파이썬 인터프리터가 한 스레드만 하나의 바이트코드를 실행 시킬 수 있도록 해주는 Lock 하나의 스레드에 모든 자원을 허락하고 그 후에는 Lock을 걸어 다른 스레드는 실행할 수 없게 막아버린다. 그런 이유로 구조적으로 충돌이 발생하는 경우가 발생한다. 이에 개선사항으로 멀티 프로세싱 모듈 지원한다.
Pool : 압력 값에 대해 process들을 건너건너 분배하여 함수 실행을 병렬하는 방법 PID : process id
* 07_multi_pool
from multiprocessing import Pool
import time
import os
def f(x):
    print('값', x, '에 대한 작업 pid', os.getpid()) # 현재 진행 중인 process의 processId를 반환
    time.sleep(1)
    return x * x

if __name__ == '__main__':
    p = Pool(3) # pool 객체 생성. 프로세스 수 3 ~ 5 권장
    startTime = int(time.time())


    for i in range(0, 10): # 0 ~ 9
        print(f(i)) # 10

    # 값 0 에 대한 작업 pid 75580
    # 0
    # 값 1 에 대한 작업 pid 75580
    # 1
    # 값 2 에 대한 작업 pid 75580
    # 4
    # 값 3 에 대한 작업 pid 75580
    # 9
    # 값 4 에 대한 작업 pid 75580
    # 16
    # 값 5 에 대한 작업 pid 75580
    # 25
    # 값 6 에 대한 작업 pid 75580
    # 36
    # 값 7 에 대한 작업 pid 75580
    # 49
    # 값 8 에 대한 작업 pid 75580
    # 64
    # 값 9 에 대한 작업 pid 75580
    # 81
    # 총 작업 시간 :  10

    print(p.map(f, range(0, 10))) # 함수와 인자값을 매핑하면서 데이터를 분배처리
    # 값 0 에 대한 작업 pid 75712
    # 값 1 에 대한 작업 pid 75604
    # 값 2 에 대한 작업 pid 75540
    # 값 3 에 대한 작업 pid 75712
    # 값 4 에 대한 작업 pid 75604
    # 값 5 에 대한 작업 pid 75540
    # 값 6 에 대한 작업 pid 75712
    # 값 7 에 대한 작업 pid 75604
    # 값 8 에 대한 작업 pid 75540
    # 값 9 에 대한 작업 pid 75712
    # [0, 1, 4, 9, 16, 25, 36, 49, 64, 81]
    # 총 작업 시간 :  5
    endTime = int(time.time())
    print('총 작업 시간 : ', (endTime - startTime))
31. process
멀티 프로세실을 위한 Process 클래스 하나의 프로세스를 하나의 함수에 적당한 인자값을 할당해주고 (없을 수도 있음) 진행
* 08_multi_process
import time
import os
from multiprocessing import Process

def func():
    print('연속 진행하고자 하는 어떤 작업')
    #time.sleep(1)

def doubler(number):
    result = number + 10
    func()
    proc = os.getpid()
    print('number : {0}, number : {1},  process id : {2}'.format(number, result, proc))

if __name__ == '__main__':
    numbers = [1, 2, 3, 4, 5]
    procs = []

    for index, number in enumerate(numbers):
        proc = Process(target = doubler, args = (number, ))
        procs.append(proc) # Process에 join() 추가할 의도
        proc.start() # doubler 함수가 호출

    for proc in procs:
        proc.join()
# 연속 진행하고자 하는 어떤 작업
# number : 1, number : 11,  process id : 11880
# 연속 진행하고자 하는 어떤 작업
# number : 2, number : 12,  process id : 59068
# 연속 진행하고자 하는 어떤 작업
# number : 3, number : 13,  process id : 55000
# 연속 진행하고자 하는 어떤 작업
# number : 4, number : 14,  process id : 74932
# 연속 진행하고자 하는 어떤 작업
# number : 5, number : 15,  process id : 55096
32. 웹 크롤링
멀티 프로세싱을 통한 웹 크롤링 연습 1 - 멀티 프로세싱 없이 작업
* 09_multi_web1
import requests
from bs4 import BeautifulSoup as bs
# html, xml 지원, json 지원x
import time

def get_links(): # 해당 컨텐츠의 a tag 얻기
    data = requests.get("https://beomi.github.io/beomi.github.io_old/").text
    soup = bs(data, 'html.parser')
    my_titles = soup.select('h3 > a')
    data = []

    for title in my_titles:
        data.append(title.get('href')) # a tag의 속성 중 href 값 반환

    return data

def get_content(link):
    abs_link = "https://beomi.github.io" + link
    req = requests.get(abs_link)
    html = req.text
    soup = bs(html, 'html.parser')
    print(soup.select('h1')[0].text) # 첫번째 h1 tag의 문자열 출력

if __name__ == '__main__':
    #print(get_links())
    #print(len(get_links())) # 26
    start_time = time.time()
    for link in get_links():
        get_content(link)

    end_time = time.time()
    print('소요시간 : %s 초'%(end_time- start_time))

# 나만의 웹 크롤러 만들기(4): Django로 크롤링한 데이터 저장하기
# 나만의 웹 크롤러 만들기(3): Selenium으로 무적 크롤러 만들기
# Django에 Social Login 붙이기: Django세팅부터 Facebook/Google 개발 설정까지
# Django에 Custom인증 붙이기
# 나만의 웹 크롤러 만들기(2): Login with Session
# 나만의 웹 크롤러 만들기 with Requests/BeautifulSoup
# Celery로 TelegramBot 알림 보내기
# Virtualenv/VirtualenvWrapper OS별 설치&이용법
# [DjangoTDDStudy] #02: UnitTest 이용해 기능 테스트 하기
# [DjangoTDDStudy] #01: 개발환경 세팅하기(Selenium / ChromeDriver)
# [DjangoTDDStudy] #00: 스터디를 시작하며
# Fabric Put 커맨드가 No Such File Exception을 반환할 때 해결법
# CKEditor의 라이센스와 오픈소스 라이센스
# ReactNative The Basis 번역을 끝냈습니다.
# [React Native 번역]#01: 시작하기
# [번역] 장고(Django)와 함께하는 Celery 첫걸음
# Chrome Native Adblockr 대체하기
# CustoMac 설치 분투기
# Ubuntu14.04에 OhMyZsh 설치
# Ubuntu14.04에서 pip로 mysqlclient 설치 실패시
# Ubuntu14.04에서 Python3기반 virtualenvwrapper 설치
# mac OS X에서 pip virtualenvwrapper 설치 시 uninstalling six 에서 Exception 발생 시
# Fabric for Python3 (Fabric3)
# Windows에서 pip로 mysqlclient 설치 실패시(python3.4/3.5)
# 맥에서 윈도RDP로 접속시 한영전환하기.
# pip로 mysqlclient설치 중 mac os x에서 egg_info / OSError 발생시 대처방법
# 소요시간 : 7.727251768112183 초
멀티 프로세싱을 통한 웹 크롤링 연습 2 - 멀티 프로세싱 사용
* 10_multi_web2
import requests
from bs4 import BeautifulSoup as bs
import time
from multiprocessing import Pool

def get_links(): # 해당 컨텐츠의 a tag 얻기
    data = requests.get("https://beomi.github.io/beomi.github.io_old/").text
    soup = bs(data, 'html.parser')
    my_titles = soup.select('h3 > a')
    data = []

    for title in my_titles:
        data.append(title.get('href')) # a tag의 속성 중 href 값 반환

    return data

def get_content(link):
    abs_link = "https://beomi.github.io" + link
    req = requests.get(abs_link)
    html = req.text
    soup = bs(html, 'html.parser')
    print(soup.select('h1')[0].text) # 첫번째 h1 tag의 문자열 출력

if __name__ == '__main__':
    start_time = time.time()
#     for link in get_links():
#         get_content(link)

    pool = Pool(processes = 4)
    pool.map(get_content, get_links())

    end_time = time.time()
    print('소요시간 : %s 초'%(end_time- start_time))

# Django에 Social Login 붙이기: Django세팅부터 Facebook/Google 개발 설정까지
# 나만의 웹 크롤러 만들기(4): Django로 크롤링한 데이터 저장하기
# Celery로 TelegramBot 알림 보내기
# 나만의 웹 크롤러 만들기(2): Login with Session
# 나만의 웹 크롤러 만들기(3): Selenium으로 무적 크롤러 만들기
# Django에 Custom인증 붙이기
# 나만의 웹 크롤러 만들기 with Requests/BeautifulSoup
# Virtualenv/VirtualenvWrapper OS별 설치&이용법
# [DjangoTDDStudy] #00: 스터디를 시작하며
# [DjangoTDDStudy] #02: UnitTest 이용해 기능 테스트 하기
# CKEditor의 라이센스와 오픈소스 라이센스
# [React Native 번역]#01: 시작하기
# Fabric Put 커맨드가 No Such File Exception을 반환할 때 해결법
# [DjangoTDDStudy] #01: 개발환경 세팅하기(Selenium / ChromeDriver)
# ReactNative The Basis 번역을 끝냈습니다.
# [번역] 장고(Django)와 함께하는 Celery 첫걸음
# Ubuntu14.04에 OhMyZsh 설치
# Chrome Native Adblockr 대체하기
# Ubuntu14.04에서 Python3기반 virtualenvwrapper 설치
# Fabric for Python3 (Fabric3)
# Ubuntu14.04에서 pip로 mysqlclient 설치 실패시
# CustoMac 설치 분투기
# mac OS X에서 pip virtualenvwrapper 설치 시 uninstalling six 에서 Exception 발생 시
# Windows에서 pip로 mysqlclient 설치 실패시(python3.4/3.5)
# 맥에서 윈도RDP로 접속시 한영전환하기.
# pip로 mysqlclient설치 중 mac os x에서 egg_info / OSError 발생시 대처방법
# 소요시간 : 3.3195197582244873 초
33. HttpServer
HttpServer 구축용 클래스를 이용해 웹서버 서비스 하기 HTTPServer : 기본적인 socket 연결을 관리하는 클래스 SimpleHTTPRequestHandler : get, head 요청만 처리가능
* 01_httpServer1
from http.server import SimpleHTTPRequestHandler, HTTPServer

PORT = 7777

handler = SimpleHTTPRequestHandler
serv = HTTPServer(('127.0.0.1', PORT), handler) # HTTPServer 서버 객체 생성
print('HTTPServer 서비스 시작')
serv.serve_forever()                            # HTTPServer 서비스 시작
<!DOCTYPE html>
<html>
<head>
<meta charset="UTF-8">
<title>Insert title here</title>
</head>
<body>
단순웹 운영중<br>
<input type = "button" value = "이전으로" onclick="history.back()">
</body>
</html>
34. CGI
CGI(Common Gateway Interface)란 웹서버(정보제공측)와 클라이언트(정보이용측)간에 필요한 정보교환을 가능하게 해주는 일종의 웹인터페이스라고(일종의 프로그램) 할 수 있습니다. PHP, ASP, ASP.NET, JSP... CGI를 지원하는 CGIHTTPRequestHandler를 사용하면 클라이언트와 서버 사이에 자료를 주고 받을 수 있다. py 문서를 처리가능 get, post 요청처리 모두 지원
* 01_httpServer2
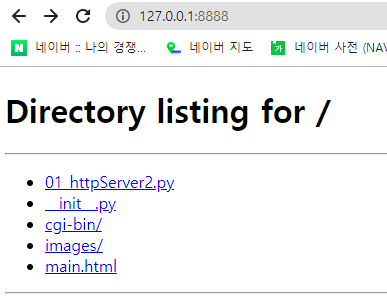
from http.server import CGIHTTPRequestHandler, HTTPServer

PORT = 8888

class HandlerClass(CGIHTTPRequestHandler):
    cgi_directories = ['/cgi-bin']

serv = HTTPServer(('127.0.0.1', PORT), HandlerClass) # HTTPServer 서버 객체 생성

print('HTTPServer 서비스 시작')
serv.serve_forever()                            # HTTPServer 서비스 시작
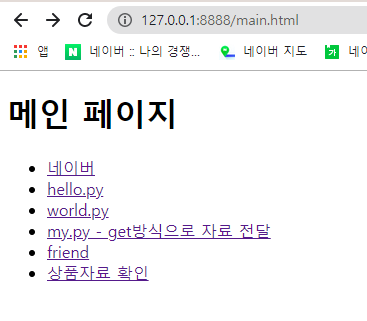
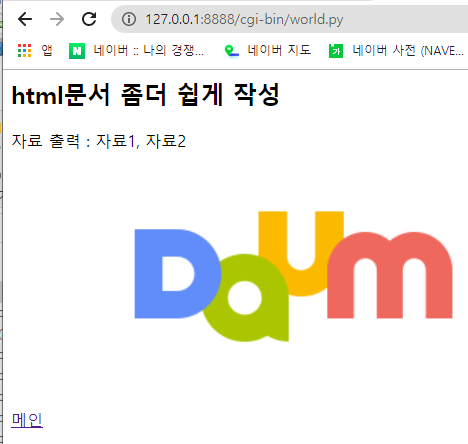
# 웹 서비스가 가능한 파이썬 파일 작성
ss = '파이썬 변수'
kbs = 9
mbc = 10 + 1.0
print('Content-Type:text/html;charset=utf-8\n')
print('<html>')
print('<body>')
print('<h2>파이썬 문서로 정보 전달</h2>')
print('<b><i>hi</i></b>')
print('<br>파이썬 변수 출력 : %s, %d, %f'%(ss, kbs, mbc))
print('</body>')
print('</html>')
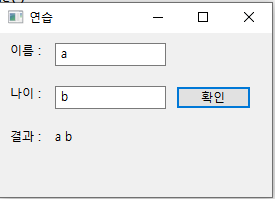
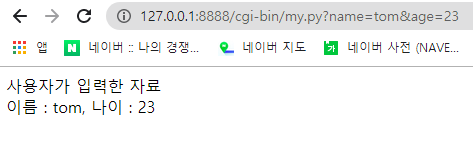
#client가 server로 자료 전달
import cgi

# 사용자(client)가 입력한 자료 받기 - get
form = cgi.FieldStorage()
name = form['name'].value
age = form['age'].value

print('Content-Type:text/html;charset=utf-8\n')
print("""
<html>
<body>
사용자가 입력한 자료 <br>
이름 : {0},
나이 : {1}
</body>
</html>
""".format(name, age))
* friend.html
<!DOCTYPE html>
<html>
<head>
<meta charset="UTF-8">
<title>Insert title here</title>
</head>
<body>
친구 자료 입력<p/>
<form action="cgi-bin/friend.py" method="post">
이름 : <input type="text" name ="name" value="홍길동"/><br>
전화 : <input type="text" name ="phone"/><br>
성별 :
<input type="radio" name="gen" value="남" checked="checked"/>남자
<input type="radio" name="gen" value="여"/>여자<br>
<br>
<input type="submit" value="전송">
</form>
</body>
</html>
* friend.py
import cgi

# 사용자(client)가 입력한 자료 받기 - post
form = cgi.FieldStorage()
name = form['name'].value
phone = form['phone'].value
gen = form['gen'].value

# 값으로 DB저장, 연산에 참여 작업 진행필요.
# 단순 출력 진행.
print('Content-Type:text/html;charset=utf-8\n')
print("""
<html>
<body>
이름 : {}<br>
전화번호 : {}<br>
성별 : {}<br>
</body>
</html>
""".format(name, phone, gen))
* sangpum
# Maria DB의 sangpum table 자료를 웹으로 출력

import MySQLdb
import ast

with open('cgi-bin/mariadb.txt', mode='r') as f:
    config = ast.literal_eval(f.read())
print('Content-Type:text/html;charset=utf-8\n')
print('<html><body><h2>상품자료 (Python 서버이용)</h2>')
print('<table border="1">')
print('<tr><th>코드</th><th>품명</th><th>수량</th><th>단가</th></tr>')
try:
    conn = MySQLdb.connect(**config)
    cursor = conn.cursor()
    cursor.execute("select * from sangdata")
    datas = cursor.fetchall()

    for code, sang, su, dan in datas:
        print("""<tr>
        <td>{0}</td>
        <td>{1}</td>
        <td>{2}</td>
        <td>{3}</td>
        </tr>""".format(code, sang, su, dan))
except Exception as e:
    print('error',e)
finally:
    cursor.close()
    conn.close()

print('</table></html></body>')
# 챗봇용 서버
from http.server import CGIHTTPRequestHandler, HTTPServer

PORT = 8080

class HandlerClass(CGIHTTPRequestHandler):
    cgi_directories = ['/cgi-bin']

serv = HTTPServer(('127.0.0.1', PORT), HandlerClass) # HTTPServer 서버 객체 생성

print('챗봇용 HTTPServer 서비스 시작')
serv.serve_forever()                            # HTTPServer 서비스 시작
* chatbot
import cgi
from botengine import make_reply
# 입력 양식의 글자 추출하기 ---
form = cgi.FieldStorage()
# 메인 처리 ---
def go_main():
m = form.getvalue("m", default="")
if m == "" :
show_form()
elif m == "say" :
api_say()
# 사용자의 입력에 응답하기 ---
def api_say():
print("Content-Type: text/plain; charset=utf-8")
print("")
txt = form.getvalue("txt", default="")
if txt == "":
return
res = make_reply(txt)
print(res)
# 입력 양식 출력하기 ---
def show_form():
print("Content-Type: text/html; charset=utf-8")
print("")
print("""
<html><meta charset="utf-8"><body>
<script src="https://code.jquery.com/jquery-3.1.1.min.js"></script>
<style>
h1{ background-color: #ffe0e0; }
div{ padding:10px; }
span{ border-radius: 10px; background-color: #ffe0e0; padding:8px; }
.bot{ text-align: left; }
.usr{ text-align: right; }
</style>
<h1>* 대화하기 *</h1>
<div id="chat"></div>
<div class='usr'>
<input id="txt" size="40">
<button onclick="say()">전송</button>
</div>
<script>
var url = "./chatbot.py";
function say() {
var txt = $('#txt').val();
$.get(url, {"m":"say","txt":txt},
function(res) {
var html = "<div class='usr'><span>" + esc(txt) +
"</span>: 나</div><div class='bot'> 봇:<span>" + esc(res) + "</span></div>";
$('#chat').html($('#chat').html()+html);
$('#txt').val('').focus();
});
}
function esc(s) {
return s.replace('&', '&').replace('<','<').replace('>', '>');
}
</script></body></html>
""")
go_main()
* botengine
import codecs
from bs4 import BeautifulSoup
import urllib.request
from konlpy.tag import Okt
import os, re, json, random

dict_file = "chatbot-data.json"
dic = {}
twitter = Okt()

# 딕셔너리에 단어 등록하기 ---
def register_dic(words):
    global dic
    if len(words) == 0: return
    tmp = ["@"]
    for i in words:
        word = i[0]
        if word == "" or word == "\r\n" or word == "\n": continue
        tmp.append(word)
        if len(tmp) < 3: continue
        if len(tmp) > 3: tmp = tmp[1:]
        set_word3(dic, tmp)
        if word == "." or word == "?":
            tmp = ["@"]
            continue
    # 딕셔너리가 변경될 때마다 저장하기
    json.dump(dic, open(dict_file,"w", encoding="utf-8"))

# 딕셔너리에 글 등록하기
def set_word3(dic, s3):
    w1, w2, w3 = s3
    if not w1 in dic: dic[w1] = {}
    if not w2 in dic[w1]: dic[w1][w2] = {}
    if not w3 in dic[w1][w2]: dic[w1][w2][w3] = 0
    dic[w1][w2][w3] += 1

# 문장 만들기 ---
def make_sentence(head):
    if not head in dic: return ""
    ret = []
    if head != "@":
        ret.append(head)
    top = dic[head]
    w1 = word_choice(top)
    w2 = word_choice(top[w1])
    ret.append(w1)
    ret.append(w2)
    while True:
        if w1 in dic and w2 in dic[w1]:
            w3 = word_choice(dic[w1][w2])
        else:
            w3 = ""
        ret.append(w3)
        if w3 == "." or w3 == "? " or w3 == "":
            break
        w1, w2 = w2, w3

    ret = "".join(ret)

    # 띄어쓰기
    params = urllib.parse.urlencode({
        "_callback": "",
        "q": ret
    })

    # 네이버의 맞춤법 검사기 api를 사용
    data = urllib.request.urlopen("https://m.search.naver.com/p/csearch/ocontent/spellchecker.nhn?" + params)
    data = data.read().decode("utf-8")[1:-2]
    data = json.loads(data)
    data = data["message"]["result"]["html"]
    data = soup = BeautifulSoup(data, "html.parser").getText()
    return data

def word_choice(sel):
    keys = sel.keys()
    return random.choice(list(keys))

# 챗봇 응답 만들기 ---
def make_reply(text):
    # 단어 학습 시키기
    if not text[-1] in [".", "?"]: text += "."
    words = twitter.pos(text)
    register_dic(words)
    # 사전에 단어가 있다면 그것을 기반으로 문장 만들기
    for word in words:
        face = word[0]
        if face in dic:
            return make_sentence(face)
    return make_sentence("@")

# 딕셔너리가 있다면 읽어 들이기
if os.path.exists(dict_file):
    dic = json.load(open(dict_file, "r"))
x = [10, 20, 30]
y = ['a', 'b']
for i in zip(x, y):
    print(i)
# (10, 'a')
# (20, 'b')
- 사용자 정의 함수
def DoFunc1():
    print('사용자정의 함수 1')

print("do1")
DoFunc1()
print("do2")
DoFunc1()
print(DoFunc1)       # 함수 이름은 객체(함수 본체)의 주소를 기억함수
print(type(DoFunc1)) # function
otherFunc = DoFunc1  # 주소 치환
otherFunc()
def DoFunc3(ar1, ar2):
    temp = ar1 + ar2
    print('temp', temp)
    # return None # default : None
    #return temp
    a = 2
    if a % 2 ==1:
        return
    else:
        return a
    print('dead')


DoFunc3(10, 20)
DoFunc3('kbs', 'mbc')
print(DoFunc3('kbs', 'mbc'))
def area_tri(a, b):
    c = a * b / 2
    if a == 0:
        return # 함수 탈출
    area_print(c) # 함수는 함수 호출가능

def area_print(c):
    print('삼각형의 넓이는 ',c)

area_tri(20, 30) # 삼각형의 넓이는  300.0
def abc():
    pass
def exam(a, b):
    ss = str(a) + '+' + str(b) + '=의 답은 : '
    ans = input(ss)
    return a + b == int(ans)

if(exam(5, 2)):
    print('good')
else:
    print('sad')
def swap(a, b):
    return b, a

a = 10; b = 20
print(swap(a, b)) # (20, 10)
def isOdd(arg):
    return arg % 2 == 1

print(isOdd(3)) # True
print(isOdd(4)) # False

myDict = {x:x*x for x in range(11) if isOdd(x)}
print(myDict) # {1: 1, 3: 9, 5: 25, 7: 49, 9: 81}
9. 변수의 생존 범위
Local < Enclosing function > Global
* test08_func
player = '전국대표'        # Global Variable

def funcSoccer():
    player = '지역대표'    # Local Variable
    name = '한국인'       # Local Variable
    print(name, player)

funcSoccer()
# print(name, player) # 지역변수는 해당 블록에서만 사용 가능. Error
global a : 블록 내의 지역변수가 아닌 전역변수를 사용하도록 한다. nonlocal a : 블록 내의 지역변수가 아닌 가까운 함수의 변수를 사용하도록 한다.
a = 10; b = 20; c = 30
print('1) a:{}, b:{}, c:{}'.format(a,b,c))

def Foo():
    a = 40
    b = 50
    def Bar():
        #c = 60
        global c # 블록 내의 지역변수가 아닌 전역변수를 사용하도록 한다.
        nonlocal b # 블록 내의 지역변수가 아닌 가까운 함수의 변수를 사용하도록 한다.
        print('2) a:{}, b:{}, c:{}'.format(a,b,c)) # Enclosing function
        c = 60   # UnboundLocalError: local variable 'c' referenced before assignment
        b = 70
    Bar()

Foo()
#Foo().Bar()
print('3) a:{}, b:{}, c:{}'.format(a,b,c))
print()
def func1(*ar):
    print(ar)
    for i in ar:
        print('음식 : ' + i)

func1('비비비')
func1('비비비','이이이','트트트트')
def func2(a, *ar):
#def func2(*ar, a): # TypeError
    print(a)
    print(ar)
    for i in ar:
        print('음식 : ' + i)

func2('비비비')
func2('비비비','이이이','트트트트')
re = 0
def selectProcess(choice, *ar):
    if choice == '+':
        re = 0
        for i in ar:
            re += i
    elif choice == '*':
        re = 1
        for i in ar:
            re *= i
    return re

print(selectProcess('+',1,2,3,4,5))
print(selectProcess('*',1,2,3,4,5))
def func3(w, h, **ect):
    print('몸무게 {}, 키 {}'.format(w, h))
    print(ect)

func3(65, 175, name = '홍길동')
func3(65, 178, name = '고길동', age = 22)
func3(w=80, h=175, name = '김길동')
def CountDown(n):
    if n == 0:
        print('처리완료')
    else:
        print(n, end = ' ')
        CountDown(n - 1) # 함수가 자신을 호출

CountDown(5) # 5 4 3 2 1 처리완료
def totFunc(su):
    if su == 1:
        print('처리 끝')
        return 1
    return su + totFunc(su - 1)

re = totFunc(10)
print('10까지의 합은 : ', re) # 10까지의 합은 :  55
11. 일급함수
: 함수 안에 함수 선언 가능, 인자로 함수 사용, 반환값이 함수 가능
def func1(a, b):
    return a + b

func2 = func1      # 함수의 주소를 치환
print(func1(2,3))  # 5
print(func2(2,3))  # 5

def func3(func):   # 인자로 함수 사용
    def func4():   # 함수 안에 함수 선언 가능
        print('내부함수')
    func4()
    return func    # 반환값이 함수 가능

mbc = func3(func1) # func1
print(mbc(3, 4))   # 내부함수 7
- Lambda : 이름이 없는 한 줄짜리 함수 형식 : lambda arg, ... :표현식 => return문 없이 결과 반환
def hap(x, y):
    return x + y
print(hap(2, 4))   # 6

aa = lambda x, y: x + y
print(aa(2, 4))    # 6

kbs = lambda a, su = 10: a + su
print(kbs(5))      # 15
print(kbs(5, 6))   # 11

sbs = lambda a, *tu, **di : print(a, tu, di)
sbs(1,2,3,tvn=3, ytn=24) # 1 (2, 3) {'tvn': 3, 'ytn': 24}

li = [lambda a, b:a+b, lambda a, b:a*b]
print(li[0](3,4))  # 7
print(li[1](3,4))  # 12
- 다른 함수에서 인자 값으로 람다를 사용 filter(함수, 집합형 자료) : 자료의 요소 하나씩를 함수에 입력하여 결과값을 집합형으로 출력
: 소스 코드의 재사용을 가능하게 하며, 소스 코드를 하나의 이름 공간으로 구분하고 관리할 수 있다. 멤버 : 일반 명령문, 함수, 모듈, 클래스 하나의 파일로 처리된다. 내장된 표준 모듈, 사용자 정의 모듈, 제 3자 모듈(third party)
* test11_module
- 내장된 표준 모듈(로딩 필요 없음) 일부 사용해 보기 작업 중 외부모듈이 필요한 경우 import 모듈명하여 사용
print(sum([2, 3])) # 내장된 표준모듈

import sys
print('모듈 경로 : ',sys.path)
sys.exit() # 프로그램 강제 종료
print('프로그램  종료')
import math
print(math.pi)# 3.141592653589793
print(math.sin(math.radians(30))) # 0.49999999999999994
import calendar
calendar.setfirstweekday(6) # 첫주 시작을 일요일로 변경
calendar.prmonth(2021,2)    # 달력 출력
#    February 2021
# Mo Tu We Th Fr Sa Su
#  1  2  3  4  5  6  7
#  8  9 10 11 12 13 14
# 15 16 17 18 19 20 21
# 22 23 24 25 26 27 28
- 난수 출력
import random
print(random.random())       # 난수 출력
print(random.randint(1, 10)) # 1~10 사이의 난수

from random import random
print(random())

from random import randint
from random import *
print(randint(1, 10))
13. 사용자 정의 모듈
* test12_my (동일 패키지)
# 사용자 정의 모듈
tot = 123 # 전역변수

def ListHap(*ar):
    print(ar)

    if __name__ == "__main__":
        print('응용프로그램이 시작되는 모듈')


def kbs():
    ch = 9
    print('공영방송', ch)

def mbc():
    print('문화방송')
* test12_our (다른 패키지)
# 사용자 정의 모듈
def Hap(a, b):
    return a + b

def Cha(a, b):
    return a - b
* test12_our2 (lib폴더 경로)
# 사용자 정의 모듈
def Gop(a, b):
    return a * b

def Nanugi(a, b):
    return a / b
* test12_module
# 사용자 정의 모듈
a = 10
print(a)

def aa():
    print('aa 출력')

# 외부 모듈의 멤버 사용하기1
import pack2.test12_my  # 경로

print('tot : ', pack2.test12_my.tot) # tot :  123

li1 =[1, 2]
li2 =[3, 4]
pack2.test12_my.ListHap(li1, li2)


def abc():
    if __name__ == "__main__":
        print('응용프로그램이 시작되는 모듈')

abc()

pack2.test12_my.kbs()
print()

# 외부 모듈의 멤버 사용하기2
from pack2 import test12_my
test12_my.mbc()

from pack2.test12_my import mbc
mbc()

from pack2.test12_my import mbc, kbs, tot
mbc()
kbs()
print(tot)
print()

# 외부 모듈의 멤버 사용하기3 - package가 다른 경우
from other.test12_our import Hap, Cha
print(Hap(5, 3)) # 8
print(Cha(5, 3)) # 2

# C:\anaconda3\Lib 경로의 모듈 사용
import test12_our2
print(test12_our2.Gop(5, 3))
print(test12_our2.Nanugi(5, 3))

import math
print(math.pi)

from test12_our2 import Gop
print(Gop(5, 3))

from math import pi
print(pi)
window - Preferences - PyDev - Interpreters - Python Interpreters - Libraries Tab 선택 안의 경로에 추가시 import 할 수 있다.
14. turtle
: Graphic 지원 모듈 사용 - turtle
* test13_graphic
import turtle
from turtle import *
pen = Pen()
pen.color('red', 'yellow')
pen.begin_fill()
while True:
    pen.forward(200)
    pen.left(170)
    if abs(pen.pos()) < 1:
        break
pen.end_fill()
done()
15. 외부 모듈 사용
* test14
① http://www.lfd.uci.edu/~gohlke/pythonlibs/ 사이트에서 모듈 다운로드하여 lib경로에 설치
② 시작 - anconda prompt - pip install pygame
import pygame
16. Class
: OOP 기법 구사 : 클래스는 새로운 이름 공간을 지원하는 단위. 멤버는 변수, 메소드, 생성자로 구성. 접근 지정자X, 메소드 오버로딩X
* test15_class
print('do')

def func():
    print('함수')
class TestClass: # 원형 클래스  - prototype (객체가 실행과 동시에 생성. new 미사용)
    abc = 1 # 멤버변수(전역변수)

    def __init__(self):
        print('생성자')

    def __del__(self):
        print('소멸자')

    def printMsg(self): # 메소드
        name = '홍길동'
        print(name)
        print(self.abc)
        self.show()

    def show(self):
        print('show')
print(TestClass.abc) # 원형 클래스의 멤버 변수 호출
TestClass.printMsg(self) # NameError: name 'self' is not defined
test = TestClass() # 생성자 호출된 후 객체 생성(instance)
# 생성자
print(test.abc) # 1
test.printMsg()          # 1. Bound method call
# 홍길동 1 show
TestClass.printMsg(test) # 2. UnBound Method call
# 홍길동 1 show
# method
print('car1 - ', car1.showData()) # car1 -  속도 : 10 킬로미터
print('car2 - ', car2.showData()) # car2 -  속도 : 30 킬로미터
car1.speed = 100
car2.speed = 200
print('car1 - ', car1.showData()) # car1 -  속도 : 100 킬로미터
print('car2 - ', car2.showData()) # car2 -  속도 : 200 킬로미터
print(Car.speed)  # 0
print(car1.speed) # 100
print(car2.speed) # 200

print(Car.color)  # AttributeError: type object 'Car' has no attribute 'color'
print(car1.color)  # 핑크
print(car2.color) # AttributeError: type object 'Car' has no attribute 'color'
* test17_class
kor = 100 # 모듈의 전역변수

def abc():
    print('모듈의 멤버 함수')

class MyClass:
    kor = 88
    """
    def __init__(self): # 기본 생성
        pass
    """
    def abc(self):
        print('클래스의 멤버 메소드')

    def showData(self):
        print(kor) # 메소드 내에서 없을 경우 모듈의 전역변수를 찾는다.
        print(self.kor)
        self.abc() # 현재 클래스 내의 메소드 콜
        abc()      # 모듈의 함수 콜
obj = MyClass()
obj.showData()
# 100
# 88
# 클래스의 멤버 메소드
# 모듈의 멤버 함수
# 클래스 = 설계도
# Singer가 갖추어야 할 기본 속성, 행위를 설계도(원형클래스)로 만든 후 모든 가수들은 Singer type으로 존재하면 됨

class Singer:
    title_song ='노래제목' # 멤버 변수

    def __init__(self):
        pass

    def sing(self):
        msg = '노래는'
        print(msg, self.title_song)

# 편의 상 아래에서 객체를 만들지만 별도의 모듈에서 Singer를 호출하여 사용하는 것이 일반적
bts = Singer()
bts.sing()              # 노래는 노래제목
bts.title_song = '다이너마이트'
bts.sing()              # 노래는 다이너마이트
bts.co = '빅히트'
print('소속사 :', bts.co) # 소속사 : 빅히트
* test18_class2
# 클래스 연습
print('do')
a = 10
def aa():
    print(a)

# 새로운 가수 타입의 객체 필요
import pack2.test18_class

print('-----------------')
twice = pack2.test18_class.Singer()
twice.sing() # 노래는 노래제목
twice.title_song = '우아하게'
twice.sing() # 노래는 우아하게
print('소속사 :', twice.co) # error
17. 포함관계 (has a 관계)
* test19_handle
# 움직이는 기계에 사용할 부품 클래스

class PohamHandle:
    quantity = 0 # 회전량

    def LeftTurn(self, quantify):
        self.quantity = quantify
        return '좌회전'

    def RightTurn(self, quantify):
        self.quantity = quantify
        return '우회전'
* test19_car
# Car 클래스 : 여러개의 부품(클래스)을 조립해서 완성된 차를 생성
class PohamCar:
    speed = 0
    turnShow = '정지'

    def __init__(self, ownerName):  # ownerName 인스턴트에만 존재. 원형클래스에는 없음
        self.owerName = ownerName
        self.handle = PohamHandle() # 클래스의 포함 관계

    def TurnHandle(self, q):        # PohamCar 메소드로 핸들을 움직이는 행위
        if q > 0:
            self.turnShow = self.handle.RightTurn(q)
        elif q < 0:
            self.turnShow = self.handle.LeftTurn(q)
        elif q == 0:
            self.turnShow = '직진'

if __name__ == '__main__':
    tom = PohamCar('톰')
    tom.TurnHandle(10)
    print(tom.owerName+'의 회전량은 ' + tom.turnShow + str(tom.handle.quantity)) # 톰의 회전량은 우회전10
    tom.TurnHandle(0)
    print(tom.owerName+'의 회전량은 ' + tom.turnShow) # 톰의 회전량은 우회전10
    print()

    oscar = PohamCar('오스카')
    oscar.TurnHandle(-5)
    print(oscar.owerName+'의 회전량은 ' + oscar.turnShow + str(oscar.handle.quantity))
    # 오스카의 회전량은 좌회전-5
* test20_has_a
- 냉장고(class)에 음식(class)을 저장
class FoodData:
    def __init__(self, name, expiry):
        self.name = name
        self.expiry = expiry
class Fridge:
    isOpend = False # 냉장고 문 개폐 여부
    foods = []      # 리스트

    def open(self):
        self.isOpend = True
        print('냉장고 문이 열렸습니다.')

    def close(self):
        self.isOpend = False
        print('냉장고 문이 닫혔습니다.')

    def put(self, thing):
        if self.isOpend == True:
            self.foods.append(thing) # 클래스의 포함
            print('냉장고에 음식을 저장하였습니다.')
            self.listFood()
        else:
            print('냉장고 문이 닫혀있어 음식을 담을 수 없습니다.')

    def listFood(self):
        for f in self.foods:
            print('-', f.name, f.expiry)
f = Fridge()
apple = FoodData('사과', '2021-3-5')
f.put(apple)    # 냉장고 문이 닫혀있어 음식을 담을 수 없습니다.
f.open()        # 냉장고 문이 열렸습니다.
f.put(apple)    # 냉장고에 음식을 저장하였습니다.
                # - 사과 2021-3-5
f.close()       # 냉장고 문이 닫혔습니다.
cola = FoodData('콜라', '2022-12-5')
f.open()        # 냉장고 문이 열렸습니다.
f.put(cola)     # 냉장고에 음식을 저장하였습니다.
                # - 사과 2021-3-5
                # - 콜라 2022-12-5
f.close()       # 냉장고 문이 닫혔습니다.
18. 상속
: 클래스가 다른 클래스의 멤버를 활용 - 상속 : 다형성을 구사
* test21_inherit
class Animal: # 별도의 모듈에서 작성하고 호출하였다고 가정
    age = 0

    def __init__(self):
        print('Animal 생성자')

    def move(self):
        print('움직이는 생물')
class Dog(Animal): # 상속
    age = 10

    def __init__(self):
        print('Dog 생성자')

    def dogShow(self):
        age = 2
        print('개')
        print('age :', age)         # 지역변수
        print('age :', self.age)    # 클래스 -> 부모
        print('age :', super().age) # 부모
dog1 = Dog()    # 자식 생성자가 있을 경우 자식 생성자만 수행
                # 자식 생성자가 없을 경우 부모 생성자가 수행
print('dog1.age :',dog1.age) # dog1.age : 0
dog1.move()                  # 움직이는 생물
dog1.dogShow()
# 개
# age : 2
# age : 10
# age : 0
class Horse(Animal):
    pass

horse = Horse()
horse.move()
클래스 상속 연습
* test22_inherit
class Person:
    say = '사람'
    age = 20
    __kbs = '공영방송' # __변수명 : private 멤버 - 현재 클래스에서만 호출 가능

    def __init__(self, age):
        print('Person 생성자')
        self.age = age

    def printInfo(self):
        print('나이 :{}, 이야기:{}'.format(self.age, self.say))

    def hello(self):
        print('hello')
        print('hello : ', self.say, self.__kbs)


pe = Person(22) # Person 생성자
pe.printInfo()  # 나이 :22, 이야기:사람
pe.hello()
# hello
# hello :  사람 공영방송
class Employee(Person):
say = "직원" # 자식과 동일한 멤버변수에 의해 부모의 say가 숨겨짐
subject = '근로자' # Employee 고유 멤버 변수
def __init__(self):
print("Employee 생성자")
def printInfo(self): # 자식과 동일한 메소드에 의해 부모의 메소드가 숨겨짐. 메소드 오버라이드
print('Employee printInfo 메소드')
def empShow(self):
say = "empShow"
print(say)
print(self.say)
self.printInfo() # 자식 -> 부모
super().printInfo() # 부모
emp = Employee() # Employee 생성자
print(emp.say, emp.age) # 직원 20
print(emp.subject) # 근로자
emp.printInfo()
# 나이 :20, 이야기:직원
# Employee printInfo 메소드
emp.empShow()
# empShow
# 직원
# Employee printInfo 메소드
# 나이 :20, 이야기:직원
class Worker(Person):
pass
wo = Worker(33) # Person 생성자
print(wo.say, wo.age) # 사람 33
wo.printInfo() # 나이 :33, 이야기:사람
class Worker(Person):
hobby = '코딩'
def __init__(self, age):
print('Worker 생성자')
#super().__init__(age) # 부모의 생성자 호출. Bound call
Person.__init__(self, age) # UnBound call
def woShow(self):
self.printInfo()
super().printInfo()
wo = Worker(27)
# Worker 생성자
# Person 생성자
wo.woShow()
# 나이 :27, 이야기:사람
# 나이 :27, 이야기:사람
class Programmer(Worker):
def __init__(self, age):
print('Programmer 생성자')
Worker.__init__(self, age)
def prShow(self):
self.printInfo()
super().printInfo()
def kbsShow(self):
print(self.say)
#print(self.__kbs) # AttributeError: 'Programmer' object has no attribute '_Programmer__kbs'
pr = Programmer(25)
# Programmer 생성자
# Worker 생성자
# Person 생성자
print(pr.say, pr.age) # 사람 25
pr.prShow()
# 나이 :25, 이야기:사람
# 나이 :25, 이야기:사람
pr.hello()
# hello
# hello : 사람 공영방송
pr.kbsShow()
# 클래스 타입확인
a = 3
print(type(a)) # int
print(type(pr)) # __main__.Programmer
print(Programmer.__bases__) # 부모클래스 확인. __main__.Worker
print(Worker.__bases__) # __main__.Person
print(Person.__bases__) # object
19. 메소드 오버라이딩
: 부모 클래스의 메소드와 동일한 이름의 메소드를 자식 클래스에서 만듦(재정의) 다형성의 근거를 제시
# 다형성
par = Parent()
par = c1 # 자식객체의 주소를 치환
par.printData() # 30 출력
par.displayData() # Parent의 displayData
print()
par = c2 # 자식객체의 주소를 치환
par.printData() # Child2 printData
par.displayData() # Child2 displayData
par.c2method() # 오버라이딩 하지않은 메소드도 호출 가능
print()
# 자바와 파이썬 차이
sbs = c1 # 주소 치환시 같은 타입이 아니더라도 객체 및 메소드 사용가능
sbs.printData()
sbs.displayData()
print()
sbs = c2
sbs.printData()
sbs.displayData()
sbs.c2method()
print()
plist = [c1, c2]
for i in plist:
i.printData()
Add Anaconda3 to my PATH environment variable Uncheck
② PyDev 설치
eclipse - help - eclipse market place - PyDev 검색 - install
general - workspace / Web - CSS/HTML/JSP에서 UTF-8로 변경
Window - Preferences - PyDev - Interpreters - Phython InterPreter - Browse for python/pypy.exe - C:\anaconda3\Phython.exe 선택 - apply
③ 가상환경 설치 시작 - anaconda - anaconda prompt 실행 conda create --name test python=3.7 anaconda 입력 가상환경 활성화 명령 : activate test 가상환경 비활성화 명령 :conda deactivate test