: 데이터 분석 시 과학적 계산을 위한 핵심 라이브러리 : ndarray 지원. 다차원 배열 객체.
: 선형대수 계산 : 파이썬 데이터 분석 핵심.
함수명
기능
import numpy as np
np.sum(x)
합
np.mean(x)
평균
np.var(x)
분산
np.std(x)
표준편차(√분산)
np.array(x, dtype=)
np.narray타입으로 변경. dtype : 내부 요소 타입 변경가능.
type(x)
타입 반환
x.dtype
데이터 타입 반환
x.shape
행 열 수 반환 (튜플)
x.ndim
차원 수 반환
x.size
원소 수 반환
np.zeros((행 수, 열 수))
0으로 채워진 (행 X 열)의 배열 생성
np.ones((행 수, 열 수))
1으로 채워진 (행 X 열)의 배열 생성
np.full((행 수, 열 수), x)
x로 채워진 (행 X 열)의 배열 생성
np.eye(x)
x행 x열의 단위 행열 생성. (대각선으로 1 채워진 행열)
np.random.rand(x)
x개의 균등분포 난수 생성.
np.random.randn(x)
x개의 정규분포 난수 생성.(평균 : 0, 표준편차 : 1)
np.random.randint(x, size(차원,행, 열)
0 ~ x-1까지 난수를 가진 행 X 열 X 차원의 배열 생성
x.copy()
배열을 복사. (복사된 배열 수정 시 원본배열 변경사항 없음)
np.arange(x, y)
x에서 y-1까지 array 생성.
x.reshape(행, 열)
배열을 행 수 X 열 수로 변경.
x.astype(y)
x를 y타입으로 변경
np.add(x, y)
배열 x, y 더하기
np.substract(x, y)
배열 x, y 빼기
np.multiply(x, y)
배열 x, y 곱하기
np.div(x, y)
배열 x, y 나누기
np.dot(x, y)
x배열 y배열 내적
np.cumsum(x)
누적 합
np.cumprod(x)
누적 곱
np.unique(x)
배열의 중복된 값 제거
np.instersect1d(x, y, assume_unique=True)
x와 y의 교집합 (assume_unique=True : 중복허용)
np.union1d(x, y)
x와 y의 합집합
x.transpose()
행렬 위치 변경(전치)
x.T
전치
x.swapaxes(a, b)
a차원과 b차원 위치 변경(전치)
np.c_[x, y]
x 배열에 y 열 추가
np.r_[x, y]
x 배열에 y 행 추가
np.append(x, y)
x 배열에 y 열 추가
np.insert(x, a, y)
x 배열에 a번째에 y 열에 추가
np.insert(x, a, y, axis=1)
x 배열에 a번째에 y 행에 추가
np.delete(x, a)
x배열에서 a 열 삭제
np.delete(x, a, axis=1)
x배열에서 a 행 삭제
np.where(조건배열, x, y)
각 배열 index마다 조건이 True면 x값 출력, False면 y값 출력
np.concatenate([x, y])
x, y배열 결합
y1, y2, ... = np.split(x, n)
x배열을 n개로 나눠 n개의 배열 리턴
y1, y2, ... = np.hsplit(x, n)
x배열을 열로 나눠 n개의 배열 리턴
y1, y2, ... = np.vsplit(x, n)
x배열을 행으로 나눠 n개의 배열 리턴
import random
random.randint(n)
0에서 n-1까지의 난수 1개 복원 추출
random.randint(start, end)
start에서 end-1까지 난수 1개의 복원 추출
random.rand(n)
0에서 1 사이의 표준정규분포를 따르는 n개의 난수 추출.
random.rand(m, n)
0에서 1 사이의 표준정규분포를 따르는 m x n의 난수 추출.
random.randn(n)
평균 0, 표준편차 1인 가우시안 정규분포의 n개 난수 추출.
random.randn(m, n)
평균 0, 표준편차 1인 가우시안 정규분포의 m x n개 난수 추출.
random.sample(리스트, k=n)
리스트에서 n개의 난수 비복원 추출
np.random.choice(배열, n)
배열에서 n개의 복원 추출
np.random.choice(배열, n, replace=False)
배열에서 n개의 비복원 추출
np.random.choice(배열, n, replace=False, p=[0.1, 0.9])
배열에서 n개의 비복원 추출. p는 n개의 원소를 가지고 총합이 1이어야함. p의 값에 따른 가중치 부여
* numpy1
- 기본 통계 함수를 직접 작성 후 함수와 결과 비교
grades = [1, 3, -2, 4]

print(grades)

def show_grades(grades):
  for g in grades:
    print(g, end = ' ')

show_grades(grades)
[1, 3, -2, 4]
1 3 -2 4
grades = [1, 3, -2, 4]
def grades_sum(grades): # 합
  tot = 0
  for g in grades:
    tot += 9
  return tot

def grades_ave(grades): # 평균
  tot = greads_sum(grades)
  ave = tot / len(grades)
  return ave

def greades_variance(grades): # 분산
  ave = grades_ave(grades)
  vari = 0
  for su in grades:
    vari += (su - ave) ** 2
  return vari / len(grades)
  #return vari / (len(grades) - 1)

def grades_std(grades):  # 표준편차
    return greades_variance(grades) ** 0.5

print('합은 ', grades_sum(grades))
print('평균은 ', grades_ave(grades))
print('분산은 ', greades_variance(grades))
print('표준편차는 ', greades_variance(grades))
=> copy()를 이용하여 복사 시 서브배열을 수정하여도 원본 데이터는 변경 되지않는다.
함수명
기능
x.copy()
배열을 복사. (복사된 배열 수정 시 원본배열 변경사항 없음)
* numpy3
# 배열 연산
import numpy as np

x = np.array([[1,2],[3,4]], dtype=np.float64)
y = np.arange(5, 9).reshape((2,2)) # 배열 변경
y = y.astype(np.float32) # 타입 변경
print(x)
[[1. 2.]
 [3. 4.]]

print(y)
[[5. 6.]
 [7. 8.]]
big_arr = np.random.rand(1000000) # 난수 발생

%timeit sum(big_arr) # python 함수

# 10 loops, best of 3: 155 ms per loop
%timeit np.sum(big_arr) # numpy 함수
# The slowest run took 23.08 times longer than the fastest. This could mean that
# an intermediate result is being cached. 1000 loops, best of 3: 538 µs per loop
=> HttpResponse(json.dumps(context), content_type="application/json") : context를 dict 타입에서 str로 변환 후
json형식의 str을 send.
12. Ajax + DB
: ajax 요청 시 DB의 직원 테이블 data 조회하여 출력하기.
= django_test11_ajax
=> create application - myajax
* settings
...

INSTALLED_APPS = [

    ...

    'myajax',
]

...

DATABASES = {
    'default': {
        'ENGINE': 'django.db.backends.mysql',
        'NAME': 'test',                # DB명 : db는 미리 작성되어 있어야 함.
        'USER': 'root',                # 계정명
        'PASSWORD': '123',             # 계정 암호
        'HOST': '127.0.0.1',           # DB가 설치된 컴의 ip
        'PORT': '3306',                # DBMS의 port 번호
    }
}

...
=> application 연결.
=> DB 설정
* anaconda prompt
cd C:\work\psou\django_test11_ajax
python manage.py inspectdb > aaa.py
* models
from django.db import models

# Create your models here.
class Sangdata(models.Model):
    code = models.IntegerField(primary_key=True)
    sang = models.CharField(max_length=20, blank=True, null=True)
    su = models.IntegerField(blank=True, null=True)
    dan = models.IntegerField(blank=True, null=True)

    class Meta:
        managed = False
        db_table = 'sangdata'
=> aaa.py의 사용할 table을 models.py에 복사 붙여넣기. (제작된 Table을 Django 형식으로 자동 생성)
Make migrations - myajax
Migrate
* urls
from django.contrib import admin
from django.urls import path
from myajax import views

urlpatterns = [
    path('admin/', admin.site.urls),
    path('', views.MainFunc),
    path('list', views.ListFunc),
    path('calldb', views.ListDbFunc),
]
<!DOCTYPE html>
<html>
<head>
<meta charset="UTF-8">
<title>Insert title here</title>
</head>
<body>


Article 자료 보기 - Djang template language 사용 <br>
{% if articles.count %}
	{% for a in articles %}
		<b>{{a.code}}</b> {{a.name}} {{a.price}} {{a.pub_date}}<br>
	{% endfor %}
{% else %}
	<p>자료가 없습니다.</p>
{% endif %}
</body>
</html>
{% if 조건 %}
{% else %}
{% endif %}
=> if 문
{% for 변수 in 자료 %}
{% endfor %}
=> for 문
6. where, group by
* settings
INSTALLED_APPS = [
    ...
    'sql_app',
]
=> application연결
* models
from django.db import models

# Create your models here.
class Profile(models.Model):
    name = models.CharField(max_length = 10)
    age = models.IntegerField()
=> DB 테이블 생성
- explore 창 - 프로젝트 오른쪽 클릭 - Django - Create application - sqlapp
-explore 창 - 프로젝트 오른쪽 클릭 - Django - Make Migrations - sqlapp
-explore 창 - 프로젝트 오른쪽 클릭 - Django - Migrate
해당 프로젝트 cmd 창 : python manage.py createsuperuser
* admin
from django.contrib import admin
from sql_app.models import Profile

# Register your models here.
class ProfileAdmin(admin.ModelAdmin):
    list_display = ('id', 'name', 'age')

admin.site.register(Profile, ProfileAdmin)
=> 테이블과 admin 계정 연결.
- http://127.0.0.1/admin/ 접속 후 login
- table data 입력
* urls
from django.contrib import admin
from django.urls import path
from sql_app import views

urlpatterns = [
    path('admin/', admin.site.urls),
    path('', views.IndexFunc),
    path('calldata/', views.CallFunc),
]
=> url과 views 연결
* views
from django.shortcuts import render
from sql_app.models import Profile
from django.db.models.aggregates import Avg, Count, Max, Min, Sum

# Create your views here.
def IndexFunc(request):
    return render(request, 'index.html')

def CallFunc(request):
    profile_list = Profile.objects.all() # 전체 자료 list로 리턴

    for row in profile_list.values_list(): # 리스트의 값들 리턴
        print(row)

    print(Profile.objects.aggregate(Avg('age')))  # select avg(age) from Profile
    print(Profile.objects.aggregate(Max('age')))
    print(Profile.objects.aggregate(Sum('age')))
    print(Profile.objects.aggregate(Count('age')))
    print(len(profile_list))
    print(Profile.objects.filter(name = '홍길동').aggregate(Avg('age'))) # where 조건
    qs = Profile.objects.values('name').annotate(Avg('age')) # group 별 작업

    for r in qs:
        print(r)

    pro_list = []

    for pro in profile_list:
        pro_dict ={}
        pro_dict['name'] = pro.name
        pro_dict['age'] = pro.age
        pro_list.append(pro_dict)
        print(pro_list)
        # [{'key1':value1, 'key2':value2, ... }, {'key1':value1, 'key2':value2, ... }, ... ]

    context = {'pro_list':pro_list}

    return render(request, 'list.html', context)
QuerySet 타입.values_list() : value list 리턴
테이블명.objects.aggregate(Avg('칼럼명')) : select avg(칼럼명) from 테이블명
테이블명.objects.aggregate(Max('칼럼명')) : select max(칼럼명) from 테이블명
테이블명.objects.aggregate(Sum('칼럼명')) : select sum(칼럼명) from 테이블명
테이블명.objects.aggregate(Count('칼럼명')) : select count(칼럼명) from 테이블명
테이블명.objects.filter(칼럼명=값) : select * from 테이블명 where 칼럼명 = 값
테이블명.objects.values('칼럼명').annotate(Avg('칼럼명')) : select avg(칼럼명) from 테이블명 group by 칼럼명
* index.html
<!DOCTYPE html>
<html>
<head>
<meta charset="UTF-8">
<title>Insert title here</title>
</head>
<body>
메인(QuerySet Test)<br>
<a href="calldata/">db 자료를 읽어 dict type으로 출력</a>
<br>
<a href="admin/">장고가 지원하는 관리자 창</a>
</body>
</html>
* list.html
<!DOCTYPE html>
<html>
<head>
<meta charset="UTF-8">
<title>Insert title here</title>
</head>
<body>
자료 보기</p>
{{pro_list}}
</body>
</html>
7. 원격 DB
= django_test06_mariadb
DB 접속하여 DataBase 생성
explore 창 - 프로젝트 오른쪽 클릭 - Django - Create application - myguset
* settings
INSTALLED_APPS = [

    ...

    'myguest',
]

...

DATABASES = {
    'default': {
        'ENGINE': 'django.db.backends.mysql',
        'NAME': 'yourdb',                     # DB명 : db는 미리 작성되어 있어야 함.
        'USER': 'root',                       # 계정명
        'PASSWORD': '123',                    # 계정 암호
        'HOST': '127.0.0.1',                  # DB가 설치된 컴의 ip
        'PORT': '3306',                       # DBMS의 port 번호
    }
}
DATABASES = { 'default': {
django.db.backends.mysql',
'NAME': 'database명', # DB명 : db는 미리 작성되어 있어야 함. 'USER': 'root', # 계정명 'PASSWORD': '123', # 계정 암호 'HOST': '127.0.0.1', # DB가 설치된 pc의 ip 'PORT': '3306', # DBMS의 port 번호 } }
=> remote DB 연결 정보.
* models
from django.db import models

# Create your models here.
class Guest(models.Model):
    myno = models.AutoField(auto_created = True, primary_key = True)
    title = models.CharField(max_length=50)
    content = models.TextField()
    regdate = models.DateTimeField()

    def __str__(self):
        return self.title

    class Meta:
        ordering = ('-title', 'id') # title이 같으면 id로 정렬
        ordering = ('-id',) # tuple 타입만 가능.
칼럼명 = models.AutoField(auto_created = True, primary_key = True) : 자동 증가하는 index 기본키 생성.
칼럼명 = models.TextField() : text타입 칼럼 생성
class Meta:
ordering = ('-칼럼명1', '칼럼명2')
=> 칼럼명1 기준 desc 정렬 후 데이터가 같은 정보에 대해 칼럼명2 기준 asc정렬.
- explore 창 - 프로젝트 오른쪽 클릭 - Django - Make Migrations -myguset
- explore 창 - 프로젝트 오른쪽 클릭 - Django - Migrate
* admin
from django.contrib import admin
from myguest.models import Guest

# Register your models here.
class GuestAdmin(admin.ModelAdmin):
    list_display = ('id', 'title', 'content', 'regdate')

admin.site.register(Guest, GuestAdmin)
=> 테이블과 admin계정 연결.
* admin계정 id 생성 및 table data 입력
* urls(django_test06_mariadb)
from django.contrib import admin
from django.urls import path
from myguest import views
from django.urls.conf import include

urlpatterns = [
    path('admin/', admin.site.urls),
    path('', views.MainFunc),
    path('guest/', include("myguest.urls")),
]
=> url과 views 연결
* urls(myguest)
from django.urls import path
from myguest import views

urlpatterns = [
    path('', views.ListFunc),
    path('insert', views.InsertFunc),
    path('insertok/', views.InsertOkFunc),
]
=> url과 views 연결
* views
from django.shortcuts import render
from myguest.models import Guest
from datetime import datetime
from django.http.response import HttpResponseRedirect

# Create your views here.
def MainFunc(request):
    return render(request, 'main.html')

def ListFunc(request):
    gdata = Guest.objects.all()                       # 전체 자료 읽기
    gdata = Guest.objects.all().order_by('title')    # order_by ascending
    gdata = Guest.objects.all().order_by('-title')   # order_by descending
    gdata = Guest.objects.all().order_by('-id')[0:2] # 정렬 후 슬라이싱
    print('gdata type : ', type(gdata))               # <class 'django.db.models.query.QuerySet'>
    return render(request, 'list.html', {'gdatas' : gdata})

def InsertFunc(request):
    return render(request, 'insert.html')

def InsertOkFunc(request):
    if request.method =='POST':
        print(request.POST.get('title'))
        print(request.POST['title'])
        # 입력자료로 테이블에 저장 : ORM
        Guest(
            title = request.POST.get('title'),
            content = request.POST.get('content'),
            regdate = datetime.now()
        ).save()
    return HttpResponseRedirect('/guest') # 추가후 목록 보기
'''
# 수정
g = Guest.objects.get(id=1)
g.title = "하하"
g.content = '하하하'
g.save()

# 삭제
g = Guest.objects.get(id=1)
g.delete
'''
테이블명.objects.all().order_by('칼럼명') : order by 칼럼명 asc
테이블명.objects.all().order_by('-칼럼명') : order by 칼럼명 desc
...

INSTALLED_APPS = [

    ...

    'mysangpum',
]

...

DATABASES = {
    'default': {
        'ENGINE': 'django.db.backends.mysql',
        'NAME': 'test',                # DB명 : db는 미리 작성되어 있어야 함.
        'USER': 'root',                # 계정명
        'PASSWORD': '123',             # 계정 암호
        'HOST': '127.0.0.1',           # DB가 설치된 컴의 ip
        'PORT': '3306',                # DBMS의 port 번호
    }
}

...

TIME_ZONE = 'Asia/Seoul'
USE_TZ = False
TIME_ZONE = 'Asia/Seoul' USE_TZ = False
=> admin 페이지에 표시되는 시간은 기본적으로 UTC(UTC+9)이므로, 입력을 해도 9시간 전으로 표시된다. 이에 표시되는 시간과 실제 DB에 입력되는 시간을 모두 Local시간(UTC)으로 맞춰 주어야 한다
* remote DB의 데이터를 Django 형식으로 불러오기
anconda 접속
cd C:\work\psou\django_test08_sangdata
python manage.py inspectdb > abc.py
=> 이미 생성되어 있는 DB를 django 형식으로 abc.py에 코드 자동 작성.
* models
from django.db import models

# Create your models here.
class Sangdata(models.Model):
    code = models.IntegerField(primary_key=True)
    sang = models.CharField(max_length=20, blank=True, null=True)
    su = models.IntegerField(blank=True, null=True)
    dan = models.IntegerField(blank=True, null=True)

    class Meta:
        managed = False
        db_table = 'sangdata'
=> abc.py의 sangdata table 내용 입력
- Django - Make migrations - mysangpum
- Django - Migrate
* urls(django_test08_sangdata)
from django.contrib import admin
from django.urls import path
from mysangpum import views
from django.urls.conf import include

urlpatterns = [
    path('admin/', admin.site.urls),
    path('', views.MainFunc),
    path('sangpum/', include('mysangpum.urls')), # 요청 위임
]
def ListFunc(request):
    ...
    # 페이지 나누기 처리 - Paginator 클래스
    datas = Sangdata.objects.all().order_by('-code') # order by code desc
    paginator = Paginator(datas, 3) # 페이지당 출력 행수를 생성자로 전달
    try:
        page = request.GET.get('page') # page 값을 read
    except:
        page = 1 # page 값이 없을 경우 1 page 출력

    try:
        data = paginator.page(page)
    except PageNotAnInteger: # page가 숫자가 아닐 경우
        data = paginator.page(1)
    except EmptyPage:
        data = paginator.page(paginator.num_pages()) # 현재 페이지 출력

    # 클라이언트 화면에 개별 페이지 번호 표시용
    allPage = range(paginator.num_pages + 1)
    #print('allPage : ', allPage) # range(0, 5)
    return render(request, 'list2.html', {'sangpums':data, 'allPage':allPage})
paginator = Paginator(데이터, 출력행수) : 객체 생성. 페이지당 출력 행수를 생성자로 전달
paginator.page(출력페이지) : 나눠진 페이지에서 출력할 페이지 입력.
paginator.num_pages : 총페이지 수
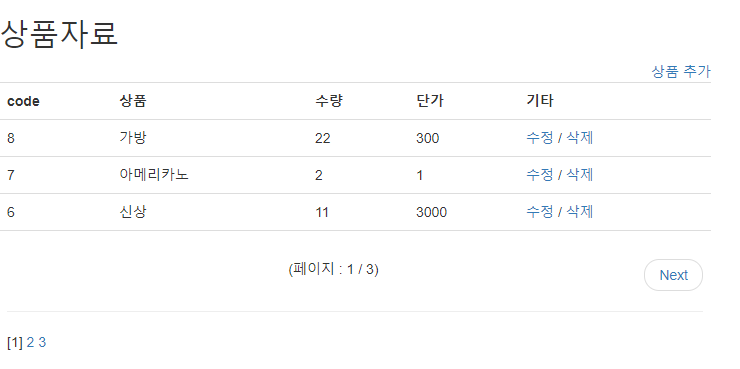
* list2.html
<!DOCTYPE html>
<html>
<head>
<meta charset="UTF-8">
<title>Insert title here</title>
<link rel="stylesheet" href="https://maxcdn.bootstrapcdn.com/bootstrap/3.4.1/css/bootstrap.min.css">
<script src="https://ajax.googleapis.com/ajax/libs/jquery/3.5.1/jquery.min.js"></script>
<script src="https://maxcdn.bootstrapcdn.com/bootstrap/3.4.1/js/bootstrap.min.js"></script>
<script type="text/javascript">
function func(){
//alert("aa");
let result = confirm("정말 삭제 할까요?")
if(result){
frm.submit();
}
}
</script>
</head>
<body>
<h2>상품자료</h2>
<div style="width:80%; text-align:right;">
<a href="/sangpum/insert">상품 추가</a>
</div>
<table class="table" style="width:80%;">
<tr>
<th>code</th><th>상품</th><th>수량</th><th>단가</th><th>기타</th>
</tr>
{% if sangpums %}
{% for s in sangpums%}
<tr>
<!-- <td>{{s.0}}</td> -->
<td>{{s.code}}</td>
<td>{{s.sang}}</td>
<td>{{s.su}}</td>
<td>{{s.dan}}</td>
<td>
<a href="/sangpum/update?code={{s.code}}">수정</a> /
<!-- 삭제 전에 묻는 작업이 필요 -->
<form action="/sangpum/delete" name="frm" method="get" style="display:inline;">
<input type="hidden" name="code" value="{{s.code}}">
<a href="javascript:void(0); onclick=func()">삭제</a>
</form>
</td>
</tr>
{% endfor%}
<!-- paging -->
<tr>
<td colspan="5">
{% if sangpums.paginator.num_pages > 1 %}
<ul class="pager">
{% if sangpums.has_previous %}
<li class="previous"><a href="/sangpum/list?page={{sangpums.previous_page_number}}">Previous</a></li>
<!-- <li><a href="/sangpum/list?page={{sangpums.previous_page_number}}">«이전</a></li> -->
{% endif %}
{% if sangpums.has_next %}
<li class="next"><a href="/sangpum/list?page={{sangpums.next_page_number}}">Next</a></li>
<!-- <li><a href="/sangpum/list?page={{sangpums.next_page_number}}">다음»</a></li> -->
{% endif %}
<li>(페이지 : {{sangpums.number}} / {{sangpums.paginator.num_pages}})</li>
</ul>
<hr>
{% for p in allPage%}
{% if p > 0 %}
{% if p == sangpums.number %}
[{{p}}]
{% elif p != sangpums.number %}
<a href="/sangpum/list?page={{p}}]"> {{p}} </a>
{% endif %}
{% endif %}
{% endfor%}
{% endif %}
</td>
</tr>
{% else %}
<tr>
<td colspan="5">자료가 없습니다.</td>
</tr>
{% endif%}
</table>
</body>
</html>
data.number : 현재페이지
data.paginator.num_pages : 총 페이지
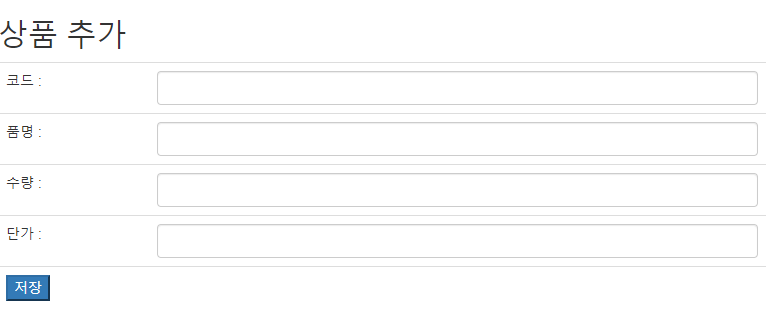
④ 게시물 추가
* views
def InsertFunc(request):
    return render(request, 'insert.html')

def InsertokFunc(request):
    if request.method == 'POST':
        code = request.POST.get("code")
        #print('code : ', code)
        # 새로운 상품 code 유무 검증 작업 후 insert 진행
        try:
            Sangdata.objects.get(code=code) # where
            #print('code 있음')
            return render(request, 'insert.html', {'msg':'이미 등록된 번호입니다.'})
        except Exception as e:
            #print('code 없음')
            Sangdata(
                code = request.POST.get("code"),
                sang = request.POST.get("sang"),
                su = request.POST.get("su"),
                dan = request.POST.get("dan"),
                ).save()
            return HttpResponseRedirect('/sangpum/list') # 추가 후 목록 보기
def DeleteFunc(request):
    delRec = Sangdata.objects.get(code=request.GET.get('code'))
    delRec.delete()
    return HttpResponseRedirect('/sangpum/list') # 삭제 후 목록 보기
- Function views 방법 - Class-base views 방법 - Including another URL conf 방법
= django_test2
* settings.py
INSTALLED_APPS = [
    'gpapp',
]
* urls.py(django_test2)
from django.contrib import admin
from django.urls import path
from gpapp import views
from gpapp.views import CallView
from django.urls.conf import include

urlpatterns = [
    path('admin/', admin.site.urls),
    path('', views.MainFunc, name='MainFunc'), # Function views 방법
    path('gpapp/callget', CallView.as_view()), # Class-base views 방법
    path('sangpum/', include('gpapp.urls')),   # Including another URLconf 방법

]
path('url명', views.메소드명) : 해당 url이 수신 시 view.py의 해당 메소드 실행.
path('url명', 클래스명.as_view()) : 해당 url 수신 시 해당 클래스 실행.
path('url명', include('application명.urls')) : 해당 url이 포함됨 url 수신 시 해당 application의 urls 파일에서 나머지 url 연결하여 실행.
* views
from django.shortcuts import render
from django.views.generic.base import TemplateView

# Create your views here.
def MainFunc(request):
    return render(request, 'index.html')

class CallView(TemplateView):
    template_name = "callget.html"

def InsertFunc(request):
    #return render(request, "insert.html") # get/post 모두 처리
    if request.method == 'GET':
        print('GET 요청')
        return render(request, "insert.html")
    elif request.method == 'POST':
        print('POST 요청')
        name = request.POST.get("name")
        name = request.POST.["name"]
        return render(request,"list.html", {"name":name})
    else:
        print('요청 에러')

def SelectFunc(request):
    pass

def UpdateFunc(request):
    pass
# 메인 urls가 각 app에 처리 위임
from django.urls import path
from gpapp import views

urlpatterns = [
    path('insert', views.InsertFunc),
    path('select', views.SelectFunc),
    path('update', views.UpdateFunc),
]
value = request.session.get('key값'): session에 key값에 value값 get.
value = request.session['key값']: session에 key값에 value값 get.
request.session.set_expiry(초) : session 유효 시간 초 단위로 설정.
* main.html
<!DOCTYPE html>
<html>
<head>
<meta charset="UTF-8">
<title>Insert title here</title>
</head>
<body>
메인화면<p/>
session 연습 : 세션이란 일정시간 동안 같은 사용자로 부터 들어오는 여러 가지 요구들을 하나의 상태를 보고 그 상태를 일정하게 유지 시킨 기술.
클라이언트와 서버 사이의 연결이 유지되는 것 처럼 하기 위해 클라이언트의 정보를 서버 컴퓨터의 일정 공간을 확보해 정보를 기억시킬 수 있다.
<br>
<a href="/setos/">운영체제 선택하기</a>
</body>
</html>
print("이전 작업 진행")
class Tiger:
    data = '호랑이 세상'

    def cry(self):
        print('호랑이 울음')
    def eat(self):
        print('고기 먹음')

class Lion:
    data = '사자 세상'

    def cry(self):
        print('사자 울음')

    def hobby(self):
        print('사자 낮잠')

class Liger(Tiger, Lion): # 먼저 명시한 부모를 먼저 인식
    pass

aa = Liger()
aa.cry()        # 호랑이 울음
aa.eat()        # 고기 먹음
aa.hobby()      # 사자 낮잠
print(aa.data)  # 호랑이 세상
print()

class Liger2(Lion, Tiger):
    data = 'Liger2 멤버 변수'

    def play(self):
        print("Liger2 고유 메소드")
        self.hobby()
        super().hobby()
        print(self.data)
        print(super().data)
bb = Liger2()
bb.cry()       # 사자 울음
bb.eat()       # 고기 먹음
bb.hobby()     # 사자 낮잠
print(bb.data) # Liger2 멤버 변수
bb.play()
# Liger2 고유 메소드
# 사자 낮잠
# 사자 낮잠
# Liger2 멤버 변수
# 사자 세상
class Animal:
    def move(self):
        pass

class Dog(Animal):
    name = '개'

    def move(self):
        print('개가 낮에 돌아다님')

class Cat(Animal):
    name = '고양이'

    def move(self):
        print('고양이가 밤에 돌아다님')

class Wolf(Dog, Cat):
    pass

class Fox(Cat, Dog):
    def move(self):
        print('여우가 돌아다님(오버라이딩)')

    def foxMove(self):
        print('여우 고유 메소드')
dog = Dog()
cat = Cat()
wolf = Wolf()
fox = Fox()

anis = [dog, cat, wolf, fox]
for a in anis:
    a.move()
# 개가 낮에 돌아다님
# 고양이가 밤에 돌아다님
# 개가 낮에 돌아다님
# 여우가 돌아다님(오버라이딩)
21. 추상클래스
추상클래스 : 추상 메소드를 가지는 클래스. 추상 메소드: 자식 클래스에서 부모의 추상메소드를 일반 메소드로 반드시 오버라이딩 하도록 강요.
* test25_abstract
from abc import *

class TestClass(metaclass = ABCMeta): # 추상 클래스
    @abstractmethod
    def abcMethod(self):              # 추상 메소드
        pass

    def normalMethod(self):           # 일반 메소드
        print('일반 메소드')

tt = TestClass()   # TypeError: Can't instantiate abstract class TestClass with abstract methods abcMethod
                   # 추상클래스가 추상메소드를 가질 경우 인스턴스 생성 시 error 발생.
                   # 추상클래스가 추상메소드를 가지지 않을 경우 인스턴스 생성 가능.
class Child1(TestClass): # 추상 클래스를 상속 받을 경우 추상메소드를 오버라이드 하지않을 경우 error 발생
    name = 'Child1'

    def abcMethod(self):
        print('Child1 추상 메소드를 오버라이딩하여 일반 메소드 생성')

# TypeError: Can't instantiate abstract class Child1 with abstract methods abcMethod
c1 = Child1()
c1.abcMethod()       # Child1 추상 메소드를 오버라이딩하여 일반 메소드 생성
c1.normalMethod()    # 일반 메소드
class Child2(TestClass):
    name = 'Child2'

    def abcMethod(self):
        print('Child2 추상 메소드를 오버라이딩하여 일반 메소드 생성')
        print('다른 클래스의 abcMethod와 이름은 같으나 다른 기능을 수행.')

    def normalMethod(self):
        print('부모의 normalMethod를 오버라이딩. 부모 메소드와 다른 역할 수행을 위해.')

c2 = Child2()
c2.abcMethod()      # Child2 추상 메소드를 오버라이딩하여 일반 메소드 생성
                    # 다른 클래스의 abcMethod와 이름은 같으나 다른 기능을 수행.
c2.normalMethod()   # 부모의 normalMethod를 오버라이딩. 부모 메소드와 다른 역할 수행을 위해.
print()
다형성 구현
my = c1
my.abcMethod()      # 1
                    #Child1 추상 메소드를 오버라이딩하여 일반 메소드 생성
my = c2
my.abcMethod()      # 1과 동일한 명령문이나 기능은 다름.
                    #Child2 추상 메소드를 오버라이딩하여 일반 메소드 생성
                    #다른 클래스의 abcMethod와 이름은 같으나 다른 기능을 수행.
def divide(a, b):
    return a / b

c = divide(5, 2)
#c = divide(5, 0) # ZeroDivisionError: division by zero
print(c)
print()

try:
    c = divide(5, 2)
    #c = divide(5, 0)
    print(c)

    aa = [1, 2]
    print(aa[0])
    print(aa[1])
    #print(aa[2]) # IndexError: list index out of range

    f = open('c:/abc.txt') # FileNotFoundError: [Errno 2] No such file or directory: 'c:/abc.txt'

except ZeroDivisionError:
    print('두번째 인자에 0을 주지마세요')

except IndexError as e:
    print('Index Error : ', e)
except Exception as err:
    print("error 발생 : ", err)
finally:
    print('에러 유무에 관계없이 반드시 수행됨')

print('프로그램 종료')
try:
    # 저장
    with open('ftest3.txt', mode = 'w', encoding = 'utf-8') as ff1:
        ff1.write('파이썬 문서 저장\n')
        ff1.write('내용\n')
        ff1.write('with문 사용으로 close() 하지않음\n')
    # 읽기
    with open('ftest3.txt', mode = 'r', encoding = 'utf-8') as ff2:
        print(ff2.read())
except Exception as e2:
    print('에러 발생', e2)
- 피클링 : 복합 개체 처리(i/o)
import pickle

try:
    dicData = {'tom':'111-1111', 'james':'222-2222'}
    listData = ['마우스', '키보드']
    tupleData = (dicData, listData) # 복합객체

    with open('hi.dat', 'wb') as fobj:
        pickle.dump(tupleData, fobj)
        pickle.dump(listData, fobj)
    print('객체를 파일로 저장하기 성공')
    print('객체 읽기')
    with open('hi.dat', 'rb') as fobj2:
        a, b = pickle.load(fobj2)
        print(a) # {'tom': '111-1111', 'james': '222-2222'}
        print(b) # ['마우스', '키보드']
        c = pickle.load(fobj2)
        print(c)
except Exception as e3:
    print('error : ' + e3)
* test28_file
- 동 이름으로 우편번호와 주소 출력
try:
    dong = input('동이름 입력 : ')
    print(dong)
    with open(r'zipcode.txt', mode = 'r', encoding = 'euc-kr') as f:
        #print(f.read())
        line = f.readline()
        while line:
            lines = line.split('\t') # tab으로 구분
            #print(lines)
            if lines[3].startswith(dong): # 입력된 동 이름으로 시작되는 주소만 처리
                print('[' + lines[0] + '] '+ lines[1] + ' '+ lines[2] + \
                      ' '+ lines[3] + ' '+ lines[4])
            line = f.readline() # readline이 없을 때 까지 수행

except Exception as e:
    print('err',e)
        # Connect Events
        self.btnCalc.id  = 1 # id 부여
        self.btnClear.id = 2
        self.btnExit.id  = 3
        self.btnCalc.Bind( wx.EVT_BUTTON, self.OnCalcProcess )
        self.btnClear.Bind( wx.EVT_BUTTON, self.OnCalcProcess )
        self.btnExit.Bind( wx.EVT_BUTTON, self.OnCalcProcess )

    def __del__( self ):
        pass


    # Virtual event handlers, overide them in your derived class
    def OnCalcProcess( self, event ):
        sel_id = event.GetEventObject().id # event 발생 객체의 id를 get
        #print(sel_id)
        if sel_id == 1: # 계산 버튼을 누를 경우
            op = self.rdoOp.GetStringSelection() # 선택된 라디오 버튼의 문자열 get
            #print(op)
            num1 = self.txtNum1.GetValue()
            num2 = self.txtNum2.GetValue()

            if num1 == '' or num2 == '':
                wx.MessageBox('값을 입력하시오', '알림', wx.OK)
                return
            try:
                result = eval(num1 + op + num2)
            except Exception as e:
                wx.MessageBox('연산오류', '알림', wx.OK)
                return

            self.staResult.SetLabel(str(result))
        elif sel_id == 2: # 초기화
            self.txtNum1.SetLabel('')
            self.txtNum2.SetLabel('')
            self.staResult.SetLabel('')
            self.rdoOp.SetSelection(0)
            self.txtNum1.SetFocus()     # UX/UI
        elif sel_id == 3:
            dlg = wx.MessageDialog(self, '정말 종료할까요?', '알림', wx.YES_NO) # MessageDialog style 입력
            temp = dlg.ShowModal() # MessageDialog 창 발생
            if temp == wx.ID_YES:  # YES 버튼을 누를 경우
                dlg.Destroy()      # MessageDialog창 닫기
                self.Close()       # Frame 닫기

if __name__ == '__main__':
    app = wx.App()
    MyFrame1(None).Show()
    app.MainLoop()
25. SQLite
: 개인용 DB SQLite3 : Python에 기본 설치됨
: 환경변수 path에 추가 : C:\anaconda3\Library\bin
* test33_sqlite
import sqlite3
print(sqlite3.version_info)

#conn = sqlite3.connect('example.db')
conn = sqlite3.connect(':memory:') # ram에 DB 생성 - 테스트용으로 연습할 때

try:
    cur = conn.cursor()

    cur.execute("create table if not exists friends(name text, phone text)")

    cur.execute("insert into friends values('홍길동', '111-1111')")
    cur.execute("insert into friends values(?, ?)", ('tom', '222-2222'))
    conn.commit()
    cur.execute("select * from friends")
    for f in cur:
        print(f[0] + " " + f[1])

except Exception as e:
    print(e)
    conn.rollback()
finally:
    conn.close()
    # 자료 수정
    sql = "update sangdata set sang=%s, su=%s, dan=%s where code=%s"
    sql_data = '깡', 7, 1000, 12
    cou = cursor.execute(sql, sql_data) # 성공하면 n, 실패시 0
    print('성공건수 ',cou)
    conn.commit()
    # 자료삭제
    code = '10'
    sql = "delete from sangdata where code =" + code # 비권장
    cursor.execute(sql)
    sql = "delete from sangdata where code = %s" # 권장 1
    cursor.execute(sql, (code,)) # 튜플
    sql = "delete from sangdata where code = '{0}'".format(code) # 권장 2
    cou = cursor.execute(sql)
    print('성공건수 ',cou)
    conn.commit()
    # 자료읽기 1
    sql = "select code, sang, su, dan from sangdata"
    cursor.execute(sql)    # DB의 자료를 읽어 cursor 객체가 그 결과를 기억

    for data in cursor.fetchall():
        #print(data)
        print('%s %s %s %s'%data)
    # 자료읽기 2
    for r in cursor:
        print(r[0], r[1], r[2], r[3])
    # 자료읽기 3
    for (code, sang, su, dan) in cursor:
        print(code, sang, su, dan)

    for (a, b, c, d) in cursor:
        print(a, b, c, d)
except MySQLdb.connections.Error as err:
    print('db err' + str(err))
except Exception as e:
    print('err' + str(e))
finally:
    cursor.close()
    conn.close()
- 키보드로 부서번호를 입력받아 해당 부서에 근무하는 직원 출력
* test35_db
import MySQLdb
import sys

config = {
    'host':'127.0.0.1',
    'user':'root',
    'password':'123',
    'database':'test',
    'port':3306,
    'charset':'utf8',
    'use_unicode':True
}

try:
    conn = MySQLdb.connect(**config)
    cursor = conn.cursor()

    buser_no = input('부서번호 입력 : ')
    sql = """
    select jikwon_no, jikwon_name, buser_num, jikwon_jik, jikwon_pay
    from jikwon
    where buser_num ={0}
    """.format(buser_no)

    cursor.execute(sql)
    datas = cursor.fetchall()

    if len(datas) == 0:
        print(str(buser_no)+ '번 부서는 없습니다.')
        sys.exit()

    for d in datas:
        print(d[0], d[1], d[2], d[3])

    print('인원수 : ' + str(len(datas)))

except Exception as e:
    print('err', e)

finally:
    cursor.close()
    conn.close()
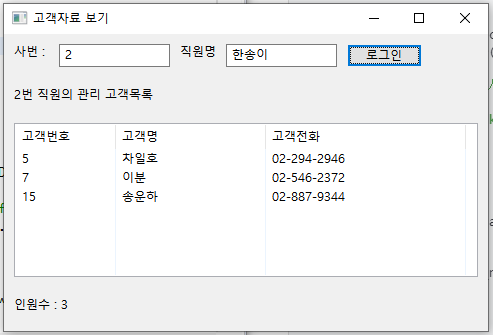
    # Virtual event handlers, overide them in your derived class
    def OnLogin( self, event ):
        if self.txtNo.GetValue() == '': # 사번을 입력안할 경우 팝업 발생
            wx.MessageBox('사번입력', '알림', wx.OK)
            self.txtNo.SetFocus()
            return

        if self.txtName.GetValue() == '': # 사번을 입력안할 경우 팝업 발생
            wx.MessageBox('직원명 입력', '알림', wx.OK)
            self.txtNo.SetFocus()
            return

        self.LoginCheck()
    def LoginCheck(self):
        try:
            conn = MySQLdb.connect(**config)
            cursor = conn.cursor()
            no = self.txtNo.GetValue()
            name = self.txtName.GetValue()
            #print(no, name)

            sql ="""
            select count(*) from jikwon
            where jikwon_no ='{0}' and jikwon_name ='{1}'
            """.format(no, name)

            cou = cursor.execute(sql)
            count = cursor.fetchone()[0]
            #print(count) # 1
            if count == 0:
                wx.MessageBox('로그인 실패', '알림', wx.OK)
                return
            else:
                self.staMsg.SetLabelText(no + '번 직원의 관리 고객목록')
                self.DisplayData(no) # 직원자료 출력 메소드 호출

        except Exception as e:
            print('LoginCheck err',e)
        finally:
            cursor.close()
            conn.close()
    def DisplayData(self, no):
        try:
            conn = MySQLdb.connect(**config)
            cursor = conn.cursor()

            sql = """
            select gogek_no, gogek_name, gogek_tel
            from gogek
            where gogek_damsano = {}
            """.format(no)

            cou = cursor.execute(sql)
            datas = cursor.fetchall()
            #print(datas)
            self.lstGogek.DeleteAllItems() # list control 초기화
            for d in datas:
                i = self.lstGogek.InsertItem(1000, 0) # List Control 최대 행수 입력
                self.lstGogek.SetItem(i, 0, str(d[0]))
                self.lstGogek.SetItem(i, 1, d[1])
                self.lstGogek.SetItem(i, 2, d[2])
            self.staCount.SetLabelText('인원수 : ' + str(len(datas)))
        except Exception as e:
            print('DisplayData err',e)
        finally:
            cursor.close()
            conn.close()


if __name__ == '__main__':
    app = wx.App()
    MyGogek(None).Show()
    app.MainLoop()
- Socket : TCP/IP Protocol(통신규약)의 프로그래머 인터페이스를 모듈로 지원
* socket_test
import socket

print(socket.getservbyname('http','tcp'))   # http port 80
print(socket.getservbyname('telnet','tcp')) # http port 23
print(socket.getservbyname('ftp','tcp'))    # http port 21
print(socket.getservbyname('smtp','tcp'))   # http port 25
print(socket.getservbyname('pop3','tcp'))   # http port 110

print()
print(socket.getaddrinfo('www.naver.com', 80, proto=socket.SOL_TCP))
# [(<AddressFamily.AF_INET: 2>, 0, 6, '', ('125.209.222.142', 80)), (<AddressFamily.AF_INET: 2>, 0, 6, '', ('223.130.195.200', 80))]
print(socket.getaddrinfo('www.daum.net', 80, proto=socket.SOL_TCP))
* soc1_server
# 접속상태 확인을 위한 단순 Echo Server - client의 요청에 1회만 반응

from socket import *

serverSock = socket(AF_INET, SOCK_STREAM) # socket(socket 종류, socket 유형)
serverSock.bind(('127.0.0.1', 9999))
serverSock.listen(1)                      # TCP 리스너 설정

print('server start')

conn, addr = serverSock.accept()
print('client addr :', addr)
print('from client message : ', conn.recv(1024).decode())
# 클라이언트로 부터 바이트 단위 문자열로 수신된 내용 출력
conn.close()
serverSock.close()
* soc1_client
# 1회 접속용 클라이언트
from socket import *

clientSock = socket(AF_INET, SOCK_STREAM)
clientSock.connect(('127.0.0.1', 9999))
clientSock.sendall('안녕 반가워'.encode(encoding='utf_8', errors='strict'))
clientSock.close()
* soc2_server
# 서버 서비스 계속 유지
import socket
import sys

HOST = ''
PORT = 8888

serverSock = socket.socket(socket.AF_INET, socket.SOCK_STREAM)

try:
    serverSock.bind((HOST, PORT))
    print('server start')
    serverSock.listen(5) # 클라이언트 접속 대기. 최대 동시 접속수는 1 ~ 5

    while True:
        conn,addr = serverSock.accept() # 클라이언트 접속 승인
        print('client info : ', addr[0], addr[1])
        print(conn.recv(1024).decode()) # 클라이언트가 전송한 메세지 수신 후 출력

        # 전송
        conn.send('from server : ' + str(addr[1]) + 'ㅁㅁㅁ'.encode('utf_8'))
except socket.error as err:
    print('socket error : ', err)
except Exception as e:
    print('error : ', e)
finally:
    serverSock.close()
- process : 실행 중인 응용프로그램을 의미, 프로세스 단위로 별도의 메모리를 사용
from subprocess import *

Popen('calc.exe')
Popen('notepad.exe')
- thread : Light weight process 라고도 함. 메인 프로세스(스레드)와 병렬적으로 수행되는 단위 프로그램. 스레드 단위로 함수나 메소드를 수행 가능.
* th1
import time

def run(id):
    for i in range(1, 11):
        print('id:{} -> {}'.format(id, i))
        time.sleep(0.5)
1. thread를 사용하지 않은 경우
run(1) # 순차적으로 호출되므로 순차적으로 처리됨
run(2)
2. thread를 사용한 경우 : 스레드 스케쥴러에 의해 랜덤하게 스레드 처리가 됨
import threading

th1 = threading.Thread(target=run, args = ('일')) # 사용자 정의 스레드 생성
th2 = threading.Thread(target=run, args = ('이'))
th1.start() # 스레드 수행 시작
th2.start()
th1.join()  # 사용자 정의 스레드가 종료될때까지 메인 스레드 대기 시킴
th2.join()

print('메인 프로그램 종료') # 메인 스레드에 의해 메인 모듈이 실행(기본 값)
* th2
스레드를 이용하여 날짜 및 시간 출력
import time
import threading

now = time.localtime()
#print(now)
print('현재는 {0}년 {1}월 {2} 일 {3} 시 {4} 분 {5} 초'.format(now.tm_year, now.tm_mon, \
                                                     now.tm_mday ,now.tm_hour,now.tm_min,now.tm_sec))

def cal_show():
        now = time.localtime()
        print('현재는 {0}년 {1}월 {2} 일 {3} 시 {4} 분 {5} 초'.format(now.tm_year, now.tm_mon, \
                                                     now.tm_mday ,now.tm_hour,now.tm_min,now.tm_sec))

def myRun():
    while True:
        now2 = time.localtime()
        if now2.tm_min == 57:
            break
        cal_show()
        time.sleep(1)

th = threading.Thread(target=myRun)
th.start()
th.join()
class MyThread(threading.Thread):
    def run(self):
        for i in range(1, 10):
            print('id{} --> {}'.format(self.getName(), i))
            time.sleep(0.1)

ths = []
for i in range(2):
    th = MyThread()
    th.start()
    ths.append(th)

for th in ths:
    th.join()

print('프로그램 종료')
- 스레드간 공유자원 값 충돌 방지 - 동기화
* th3
import threading, time
g_count = 0 # 전역변수는 자동으로 스레드의 공유자원이 됨

lock = threading.Lock()

def threadCount(id, count):
    global g_count
    for i in range(count):
        lock.acquire() # 두 개 이상의 스레드 공유 자원 충돌방지. lock을 걸어 다른 스레드 수행대기.
        print('id %s => count : %s, g_count : %s'%(id, i, g_count))
        g_count += 1
        lock.release() # lock을 해제

for i in range(1, 6):
    threading.Thread(target=threadCount, args =(i, 5)).start()

time.sleep(2)
print('final g_count : ', g_count)
print('finish process')
- 스레드의 활성화/비활성화
* th4
import threading, time
bread_plate = 0 # 빵 접시 - 공유자원
lock = threading.Condition()

class Maker(threading.Thread): # 빵 생성자
    def run(self):
        global bread_plate

        for i in range(30):
            lock.acquire() # 공유자운 충동방지

            while bread_plate >=10:
                print('빵 생산 초과로 대기')
                lock.wait() # 쓰레드 비활성화

            bread_plate += 1
            print('빵 생산 후 접시에 담기 : ', bread_plate)

            lock.notify() # 쓰레드 활성화
            lock.release()
            time.sleep(0.05)

class Eater(threading.Thread): # 빵 소비자
    def run(self):
        global bread_plate

        for i in range(30):
            lock.acquire() # 공유자원 충동방지

            while bread_plate <1:
                print('빵이 없어 대기')
                lock.wait() # 쓰레드 비활성화

            bread_plate -= 1
            print('빵 소비 후 접시의 빵 수 : ', bread_plate)

            lock.notify() # 쓰레드 활성화
            lock.release()
            time.sleep(0.07)
mak = []
con = []
for i in range(5): # 빵 생산자 수
    mak.append(Maker())

for i in range(5): # 빵 소비자 수
    con.append(Eater())

for th1 in mak:
    th1.start()

for th2 in con:
    th2.start()

for th1 in mak:
    th1.join()

for th2 in con:
    th2.join()

print('process 끝')
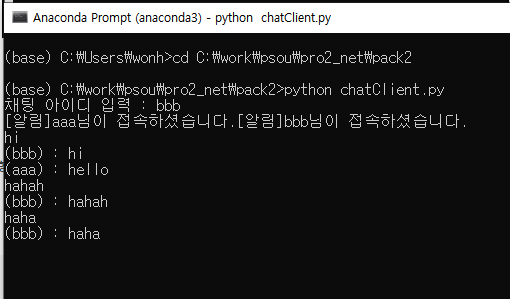
29. 멀티 쓰레드 채팅 프로그램
: socket, thread 사용
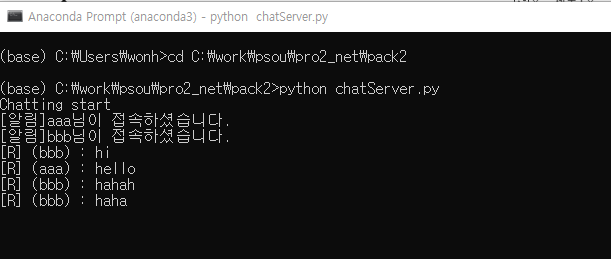
* chatServer (서버)
import socket
import threading

ss = socket.socket(socket.AF_INET, socket.SOCK_STREAM) # 서버 소켓 생성
ss.bind(('127.0.0.1', 5000))                           # ip에 연결
ss.listen(5)                                           # 동접속자 수 최대 5로 리스너 설정
print('Chatting start')
users = []

def ChatUser(conn):
    name = conn.recv(1024)
    data = '[알림]' + name.decode('utf_8') + '님이 접속하셨습니다.'
    print(data)

    try:
        for p in users:                                # 다른 클라이언트에도 접속 메시지 send
            p.send(data.encode('utf_8'))

        while True:                                    # 채팅 진행
            msg = conn.recv(1024)                      # 수신한 메세지
            data = '('+name.decode('utf_8') + ') : ' + msg.decode() # 송부자 + 메세지
            print('[R] '+data)
            for p in users:                            # 다른 클라이언트에도 메시지 send
                p.send(data.encode('utf_8'))
    except Exception as e:                             # 접속 종료 시
        users.remove(conn)                             # 접속 종료 시 list에 conn 제거
        data = '[알림]' + name.decode('utf_8') + '님이 접속을 종료하셨습니다.'
        print(data)
        print(e)
        if users:                                      # 다른 클라이언트에도 접속 종료 메시지 send
            for p in users:
                p.send(data.encode('utf_8'))
        else:
            print('exit')

while True:
    conn, addr = ss.accept()                           # 소켓 접속 및 대기. 클라이언트 접속 시 값 리턴
    users.append(conn)                                 # 접속 시 list에 conn 추가
    th = threading.Thread(target=ChatUser, args = (conn, )) # 접속자 수 만큼 쓰레드 생성
    th.start()
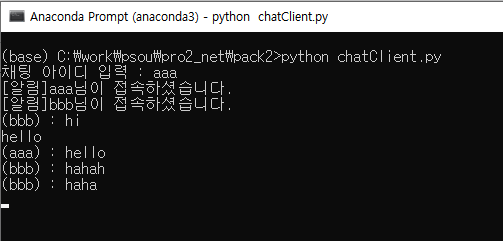
*chatClient (클라이언트)
import socket
import threading
import sys
def Handle(socket):
    while True:
        data = socket.recv(1024)
        if not data: continue
        print(data.decode('utf_8'))                    # 파이썬 표준 출력은 버퍼링 된다.
        #print(data.decode('utf_8', flush=true))

sys.stdout.flush()                                     # 표준 입출력 버퍼 비움

cs = socket.socket(socket.AF_INET, socket.SOCK_STREAM) # 클라이언트 소켓 생성
cs.connect(('127.0.0.1', 5000))                        # 해당 ip에 접속

name = input('채팅 아이디 입력 : ')
cs.send(name.encode('utf_8'))                          # 접속 id send

th = threading.Thread(target=Handle, args = (cs,))     # 쓰레드 생성
th.start()

while True:
    msg = input()                                      # 채팅 메세지 입력
    sys.stdout.flush()

    if not msg:continue
    cs.send(msg.encode('utf_8'))                       # msg가 있을 경우 msg send

cs.close()
30. pool
GIL(Global Interpreter Lock) 파이썬 인터프리터가 한 스레드만 하나의 바이트코드를 실행 시킬 수 있도록 해주는 Lock 하나의 스레드에 모든 자원을 허락하고 그 후에는 Lock을 걸어 다른 스레드는 실행할 수 없게 막아버린다. 그런 이유로 구조적으로 충돌이 발생하는 경우가 발생한다. 이에 개선사항으로 멀티 프로세싱 모듈 지원한다.
Pool : 압력 값에 대해 process들을 건너건너 분배하여 함수 실행을 병렬하는 방법 PID : process id
* 07_multi_pool
from multiprocessing import Pool
import time
import os
def f(x):
    print('값', x, '에 대한 작업 pid', os.getpid()) # 현재 진행 중인 process의 processId를 반환
    time.sleep(1)
    return x * x

if __name__ == '__main__':
    p = Pool(3) # pool 객체 생성. 프로세스 수 3 ~ 5 권장
    startTime = int(time.time())


    for i in range(0, 10): # 0 ~ 9
        print(f(i)) # 10

    # 값 0 에 대한 작업 pid 75580
    # 0
    # 값 1 에 대한 작업 pid 75580
    # 1
    # 값 2 에 대한 작업 pid 75580
    # 4
    # 값 3 에 대한 작업 pid 75580
    # 9
    # 값 4 에 대한 작업 pid 75580
    # 16
    # 값 5 에 대한 작업 pid 75580
    # 25
    # 값 6 에 대한 작업 pid 75580
    # 36
    # 값 7 에 대한 작업 pid 75580
    # 49
    # 값 8 에 대한 작업 pid 75580
    # 64
    # 값 9 에 대한 작업 pid 75580
    # 81
    # 총 작업 시간 :  10

    print(p.map(f, range(0, 10))) # 함수와 인자값을 매핑하면서 데이터를 분배처리
    # 값 0 에 대한 작업 pid 75712
    # 값 1 에 대한 작업 pid 75604
    # 값 2 에 대한 작업 pid 75540
    # 값 3 에 대한 작업 pid 75712
    # 값 4 에 대한 작업 pid 75604
    # 값 5 에 대한 작업 pid 75540
    # 값 6 에 대한 작업 pid 75712
    # 값 7 에 대한 작업 pid 75604
    # 값 8 에 대한 작업 pid 75540
    # 값 9 에 대한 작업 pid 75712
    # [0, 1, 4, 9, 16, 25, 36, 49, 64, 81]
    # 총 작업 시간 :  5
    endTime = int(time.time())
    print('총 작업 시간 : ', (endTime - startTime))
31. process
멀티 프로세실을 위한 Process 클래스 하나의 프로세스를 하나의 함수에 적당한 인자값을 할당해주고 (없을 수도 있음) 진행
* 08_multi_process
import time
import os
from multiprocessing import Process

def func():
    print('연속 진행하고자 하는 어떤 작업')
    #time.sleep(1)

def doubler(number):
    result = number + 10
    func()
    proc = os.getpid()
    print('number : {0}, number : {1},  process id : {2}'.format(number, result, proc))

if __name__ == '__main__':
    numbers = [1, 2, 3, 4, 5]
    procs = []

    for index, number in enumerate(numbers):
        proc = Process(target = doubler, args = (number, ))
        procs.append(proc) # Process에 join() 추가할 의도
        proc.start() # doubler 함수가 호출

    for proc in procs:
        proc.join()
# 연속 진행하고자 하는 어떤 작업
# number : 1, number : 11,  process id : 11880
# 연속 진행하고자 하는 어떤 작업
# number : 2, number : 12,  process id : 59068
# 연속 진행하고자 하는 어떤 작업
# number : 3, number : 13,  process id : 55000
# 연속 진행하고자 하는 어떤 작업
# number : 4, number : 14,  process id : 74932
# 연속 진행하고자 하는 어떤 작업
# number : 5, number : 15,  process id : 55096
32. 웹 크롤링
멀티 프로세싱을 통한 웹 크롤링 연습 1 - 멀티 프로세싱 없이 작업
* 09_multi_web1
import requests
from bs4 import BeautifulSoup as bs
# html, xml 지원, json 지원x
import time

def get_links(): # 해당 컨텐츠의 a tag 얻기
    data = requests.get("https://beomi.github.io/beomi.github.io_old/").text
    soup = bs(data, 'html.parser')
    my_titles = soup.select('h3 > a')
    data = []

    for title in my_titles:
        data.append(title.get('href')) # a tag의 속성 중 href 값 반환

    return data

def get_content(link):
    abs_link = "https://beomi.github.io" + link
    req = requests.get(abs_link)
    html = req.text
    soup = bs(html, 'html.parser')
    print(soup.select('h1')[0].text) # 첫번째 h1 tag의 문자열 출력

if __name__ == '__main__':
    #print(get_links())
    #print(len(get_links())) # 26
    start_time = time.time()
    for link in get_links():
        get_content(link)

    end_time = time.time()
    print('소요시간 : %s 초'%(end_time- start_time))

# 나만의 웹 크롤러 만들기(4): Django로 크롤링한 데이터 저장하기
# 나만의 웹 크롤러 만들기(3): Selenium으로 무적 크롤러 만들기
# Django에 Social Login 붙이기: Django세팅부터 Facebook/Google 개발 설정까지
# Django에 Custom인증 붙이기
# 나만의 웹 크롤러 만들기(2): Login with Session
# 나만의 웹 크롤러 만들기 with Requests/BeautifulSoup
# Celery로 TelegramBot 알림 보내기
# Virtualenv/VirtualenvWrapper OS별 설치&이용법
# [DjangoTDDStudy] #02: UnitTest 이용해 기능 테스트 하기
# [DjangoTDDStudy] #01: 개발환경 세팅하기(Selenium / ChromeDriver)
# [DjangoTDDStudy] #00: 스터디를 시작하며
# Fabric Put 커맨드가 No Such File Exception을 반환할 때 해결법
# CKEditor의 라이센스와 오픈소스 라이센스
# ReactNative The Basis 번역을 끝냈습니다.
# [React Native 번역]#01: 시작하기
# [번역] 장고(Django)와 함께하는 Celery 첫걸음
# Chrome Native Adblockr 대체하기
# CustoMac 설치 분투기
# Ubuntu14.04에 OhMyZsh 설치
# Ubuntu14.04에서 pip로 mysqlclient 설치 실패시
# Ubuntu14.04에서 Python3기반 virtualenvwrapper 설치
# mac OS X에서 pip virtualenvwrapper 설치 시 uninstalling six 에서 Exception 발생 시
# Fabric for Python3 (Fabric3)
# Windows에서 pip로 mysqlclient 설치 실패시(python3.4/3.5)
# 맥에서 윈도RDP로 접속시 한영전환하기.
# pip로 mysqlclient설치 중 mac os x에서 egg_info / OSError 발생시 대처방법
# 소요시간 : 7.727251768112183 초
멀티 프로세싱을 통한 웹 크롤링 연습 2 - 멀티 프로세싱 사용
* 10_multi_web2
import requests
from bs4 import BeautifulSoup as bs
import time
from multiprocessing import Pool

def get_links(): # 해당 컨텐츠의 a tag 얻기
    data = requests.get("https://beomi.github.io/beomi.github.io_old/").text
    soup = bs(data, 'html.parser')
    my_titles = soup.select('h3 > a')
    data = []

    for title in my_titles:
        data.append(title.get('href')) # a tag의 속성 중 href 값 반환

    return data

def get_content(link):
    abs_link = "https://beomi.github.io" + link
    req = requests.get(abs_link)
    html = req.text
    soup = bs(html, 'html.parser')
    print(soup.select('h1')[0].text) # 첫번째 h1 tag의 문자열 출력

if __name__ == '__main__':
    start_time = time.time()
#     for link in get_links():
#         get_content(link)

    pool = Pool(processes = 4)
    pool.map(get_content, get_links())

    end_time = time.time()
    print('소요시간 : %s 초'%(end_time- start_time))

# Django에 Social Login 붙이기: Django세팅부터 Facebook/Google 개발 설정까지
# 나만의 웹 크롤러 만들기(4): Django로 크롤링한 데이터 저장하기
# Celery로 TelegramBot 알림 보내기
# 나만의 웹 크롤러 만들기(2): Login with Session
# 나만의 웹 크롤러 만들기(3): Selenium으로 무적 크롤러 만들기
# Django에 Custom인증 붙이기
# 나만의 웹 크롤러 만들기 with Requests/BeautifulSoup
# Virtualenv/VirtualenvWrapper OS별 설치&이용법
# [DjangoTDDStudy] #00: 스터디를 시작하며
# [DjangoTDDStudy] #02: UnitTest 이용해 기능 테스트 하기
# CKEditor의 라이센스와 오픈소스 라이센스
# [React Native 번역]#01: 시작하기
# Fabric Put 커맨드가 No Such File Exception을 반환할 때 해결법
# [DjangoTDDStudy] #01: 개발환경 세팅하기(Selenium / ChromeDriver)
# ReactNative The Basis 번역을 끝냈습니다.
# [번역] 장고(Django)와 함께하는 Celery 첫걸음
# Ubuntu14.04에 OhMyZsh 설치
# Chrome Native Adblockr 대체하기
# Ubuntu14.04에서 Python3기반 virtualenvwrapper 설치
# Fabric for Python3 (Fabric3)
# Ubuntu14.04에서 pip로 mysqlclient 설치 실패시
# CustoMac 설치 분투기
# mac OS X에서 pip virtualenvwrapper 설치 시 uninstalling six 에서 Exception 발생 시
# Windows에서 pip로 mysqlclient 설치 실패시(python3.4/3.5)
# 맥에서 윈도RDP로 접속시 한영전환하기.
# pip로 mysqlclient설치 중 mac os x에서 egg_info / OSError 발생시 대처방법
# 소요시간 : 3.3195197582244873 초
33. HttpServer
HttpServer 구축용 클래스를 이용해 웹서버 서비스 하기 HTTPServer : 기본적인 socket 연결을 관리하는 클래스 SimpleHTTPRequestHandler : get, head 요청만 처리가능
* 01_httpServer1
from http.server import SimpleHTTPRequestHandler, HTTPServer

PORT = 7777

handler = SimpleHTTPRequestHandler
serv = HTTPServer(('127.0.0.1', PORT), handler) # HTTPServer 서버 객체 생성
print('HTTPServer 서비스 시작')
serv.serve_forever()                            # HTTPServer 서비스 시작
<!DOCTYPE html>
<html>
<head>
<meta charset="UTF-8">
<title>Insert title here</title>
</head>
<body>
단순웹 운영중<br>
<input type = "button" value = "이전으로" onclick="history.back()">
</body>
</html>
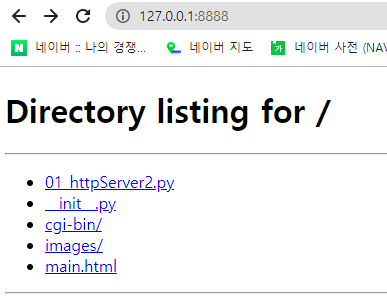
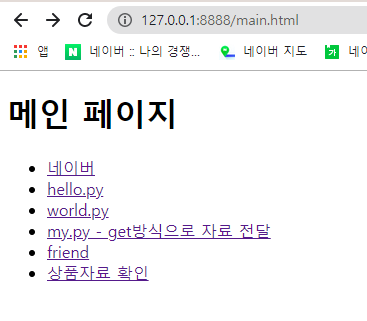
34. CGI
CGI(Common Gateway Interface)란 웹서버(정보제공측)와 클라이언트(정보이용측)간에 필요한 정보교환을 가능하게 해주는 일종의 웹인터페이스라고(일종의 프로그램) 할 수 있습니다. PHP, ASP, ASP.NET, JSP... CGI를 지원하는 CGIHTTPRequestHandler를 사용하면 클라이언트와 서버 사이에 자료를 주고 받을 수 있다. py 문서를 처리가능 get, post 요청처리 모두 지원
* 01_httpServer2
from http.server import CGIHTTPRequestHandler, HTTPServer

PORT = 8888

class HandlerClass(CGIHTTPRequestHandler):
    cgi_directories = ['/cgi-bin']

serv = HTTPServer(('127.0.0.1', PORT), HandlerClass) # HTTPServer 서버 객체 생성

print('HTTPServer 서비스 시작')
serv.serve_forever()                            # HTTPServer 서비스 시작
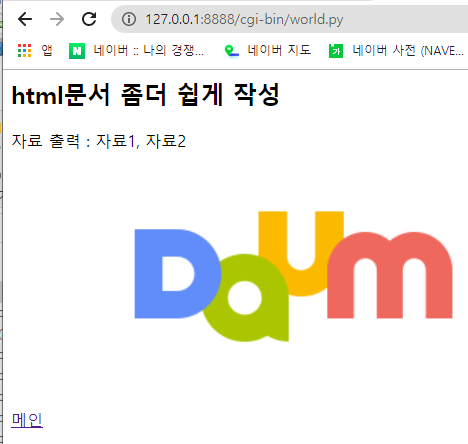
# 웹 서비스가 가능한 파이썬 파일 작성
ss = '파이썬 변수'
kbs = 9
mbc = 10 + 1.0
print('Content-Type:text/html;charset=utf-8\n')
print('<html>')
print('<body>')
print('<h2>파이썬 문서로 정보 전달</h2>')
print('<b><i>hi</i></b>')
print('<br>파이썬 변수 출력 : %s, %d, %f'%(ss, kbs, mbc))
print('</body>')
print('</html>')
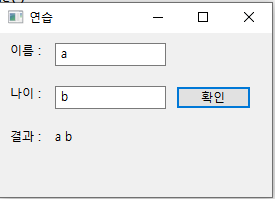
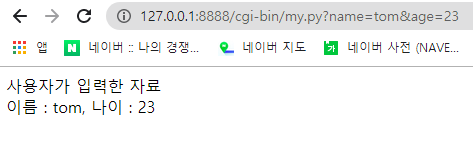
#client가 server로 자료 전달
import cgi

# 사용자(client)가 입력한 자료 받기 - get
form = cgi.FieldStorage()
name = form['name'].value
age = form['age'].value

print('Content-Type:text/html;charset=utf-8\n')
print("""
<html>
<body>
사용자가 입력한 자료 <br>
이름 : {0},
나이 : {1}
</body>
</html>
""".format(name, age))
* friend.html
<!DOCTYPE html>
<html>
<head>
<meta charset="UTF-8">
<title>Insert title here</title>
</head>
<body>
친구 자료 입력<p/>
<form action="cgi-bin/friend.py" method="post">
이름 : <input type="text" name ="name" value="홍길동"/><br>
전화 : <input type="text" name ="phone"/><br>
성별 :
<input type="radio" name="gen" value="남" checked="checked"/>남자
<input type="radio" name="gen" value="여"/>여자<br>
<br>
<input type="submit" value="전송">
</form>
</body>
</html>
* friend.py
import cgi

# 사용자(client)가 입력한 자료 받기 - post
form = cgi.FieldStorage()
name = form['name'].value
phone = form['phone'].value
gen = form['gen'].value

# 값으로 DB저장, 연산에 참여 작업 진행필요.
# 단순 출력 진행.
print('Content-Type:text/html;charset=utf-8\n')
print("""
<html>
<body>
이름 : {}<br>
전화번호 : {}<br>
성별 : {}<br>
</body>
</html>
""".format(name, phone, gen))
* sangpum
# Maria DB의 sangpum table 자료를 웹으로 출력

import MySQLdb
import ast

with open('cgi-bin/mariadb.txt', mode='r') as f:
    config = ast.literal_eval(f.read())
print('Content-Type:text/html;charset=utf-8\n')
print('<html><body><h2>상품자료 (Python 서버이용)</h2>')
print('<table border="1">')
print('<tr><th>코드</th><th>품명</th><th>수량</th><th>단가</th></tr>')
try:
    conn = MySQLdb.connect(**config)
    cursor = conn.cursor()
    cursor.execute("select * from sangdata")
    datas = cursor.fetchall()

    for code, sang, su, dan in datas:
        print("""<tr>
        <td>{0}</td>
        <td>{1}</td>
        <td>{2}</td>
        <td>{3}</td>
        </tr>""".format(code, sang, su, dan))
except Exception as e:
    print('error',e)
finally:
    cursor.close()
    conn.close()

print('</table></html></body>')
# 챗봇용 서버
from http.server import CGIHTTPRequestHandler, HTTPServer

PORT = 8080

class HandlerClass(CGIHTTPRequestHandler):
    cgi_directories = ['/cgi-bin']

serv = HTTPServer(('127.0.0.1', PORT), HandlerClass) # HTTPServer 서버 객체 생성

print('챗봇용 HTTPServer 서비스 시작')
serv.serve_forever()                            # HTTPServer 서비스 시작
* chatbot
import cgi
from botengine import make_reply
# 입력 양식의 글자 추출하기 ---
form = cgi.FieldStorage()
# 메인 처리 ---
def go_main():
m = form.getvalue("m", default="")
if m == "" :
show_form()
elif m == "say" :
api_say()
# 사용자의 입력에 응답하기 ---
def api_say():
print("Content-Type: text/plain; charset=utf-8")
print("")
txt = form.getvalue("txt", default="")
if txt == "":
return
res = make_reply(txt)
print(res)
# 입력 양식 출력하기 ---
def show_form():
print("Content-Type: text/html; charset=utf-8")
print("")
print("""
<html><meta charset="utf-8"><body>
<script src="https://code.jquery.com/jquery-3.1.1.min.js"></script>
<style>
h1{ background-color: #ffe0e0; }
div{ padding:10px; }
span{ border-radius: 10px; background-color: #ffe0e0; padding:8px; }
.bot{ text-align: left; }
.usr{ text-align: right; }
</style>
<h1>* 대화하기 *</h1>
<div id="chat"></div>
<div class='usr'>
<input id="txt" size="40">
<button onclick="say()">전송</button>
</div>
<script>
var url = "./chatbot.py";
function say() {
var txt = $('#txt').val();
$.get(url, {"m":"say","txt":txt},
function(res) {
var html = "<div class='usr'><span>" + esc(txt) +
"</span>: 나</div><div class='bot'> 봇:<span>" + esc(res) + "</span></div>";
$('#chat').html($('#chat').html()+html);
$('#txt').val('').focus();
});
}
function esc(s) {
return s.replace('&', '&').replace('<','<').replace('>', '>');
}
</script></body></html>
""")
go_main()
* botengine
import codecs
from bs4 import BeautifulSoup
import urllib.request
from konlpy.tag import Okt
import os, re, json, random

dict_file = "chatbot-data.json"
dic = {}
twitter = Okt()

# 딕셔너리에 단어 등록하기 ---
def register_dic(words):
    global dic
    if len(words) == 0: return
    tmp = ["@"]
    for i in words:
        word = i[0]
        if word == "" or word == "\r\n" or word == "\n": continue
        tmp.append(word)
        if len(tmp) < 3: continue
        if len(tmp) > 3: tmp = tmp[1:]
        set_word3(dic, tmp)
        if word == "." or word == "?":
            tmp = ["@"]
            continue
    # 딕셔너리가 변경될 때마다 저장하기
    json.dump(dic, open(dict_file,"w", encoding="utf-8"))

# 딕셔너리에 글 등록하기
def set_word3(dic, s3):
    w1, w2, w3 = s3
    if not w1 in dic: dic[w1] = {}
    if not w2 in dic[w1]: dic[w1][w2] = {}
    if not w3 in dic[w1][w2]: dic[w1][w2][w3] = 0
    dic[w1][w2][w3] += 1

# 문장 만들기 ---
def make_sentence(head):
    if not head in dic: return ""
    ret = []
    if head != "@":
        ret.append(head)
    top = dic[head]
    w1 = word_choice(top)
    w2 = word_choice(top[w1])
    ret.append(w1)
    ret.append(w2)
    while True:
        if w1 in dic and w2 in dic[w1]:
            w3 = word_choice(dic[w1][w2])
        else:
            w3 = ""
        ret.append(w3)
        if w3 == "." or w3 == "? " or w3 == "":
            break
        w1, w2 = w2, w3

    ret = "".join(ret)

    # 띄어쓰기
    params = urllib.parse.urlencode({
        "_callback": "",
        "q": ret
    })

    # 네이버의 맞춤법 검사기 api를 사용
    data = urllib.request.urlopen("https://m.search.naver.com/p/csearch/ocontent/spellchecker.nhn?" + params)
    data = data.read().decode("utf-8")[1:-2]
    data = json.loads(data)
    data = data["message"]["result"]["html"]
    data = soup = BeautifulSoup(data, "html.parser").getText()
    return data

def word_choice(sel):
    keys = sel.keys()
    return random.choice(list(keys))

# 챗봇 응답 만들기 ---
def make_reply(text):
    # 단어 학습 시키기
    if not text[-1] in [".", "?"]: text += "."
    words = twitter.pos(text)
    register_dic(words)
    # 사전에 단어가 있다면 그것을 기반으로 문장 만들기
    for word in words:
        face = word[0]
        if face in dic:
            return make_sentence(face)
    return make_sentence("@")

# 딕셔너리가 있다면 읽어 들이기
if os.path.exists(dict_file):
    dic = json.load(open(dict_file, "r"))
x = [10, 20, 30]
y = ['a', 'b']
for i in zip(x, y):
    print(i)
# (10, 'a')
# (20, 'b')
- 사용자 정의 함수
def DoFunc1():
    print('사용자정의 함수 1')

print("do1")
DoFunc1()
print("do2")
DoFunc1()
print(DoFunc1)       # 함수 이름은 객체(함수 본체)의 주소를 기억함수
print(type(DoFunc1)) # function
otherFunc = DoFunc1  # 주소 치환
otherFunc()
def DoFunc3(ar1, ar2):
    temp = ar1 + ar2
    print('temp', temp)
    # return None # default : None
    #return temp
    a = 2
    if a % 2 ==1:
        return
    else:
        return a
    print('dead')


DoFunc3(10, 20)
DoFunc3('kbs', 'mbc')
print(DoFunc3('kbs', 'mbc'))
def area_tri(a, b):
    c = a * b / 2
    if a == 0:
        return # 함수 탈출
    area_print(c) # 함수는 함수 호출가능

def area_print(c):
    print('삼각형의 넓이는 ',c)

area_tri(20, 30) # 삼각형의 넓이는  300.0
def abc():
    pass
def exam(a, b):
ss = str(a) + '+' + str(b) + '=의 답은 : '
ans = input(ss)
return a + b == int(ans)
if(exam(5, 2)):
print('good')
else:
print('sad')
def swap(a, b):
return b, a
a = 10; b = 20
print(swap(a, b)) # (20, 10)
def isOdd(arg):
return arg % 2 == 1
print(isOdd(3)) # True
print(isOdd(4)) # False
myDict = {x:x*x for x in range(11) if isOdd(x)}
print(myDict) # {1: 1, 3: 9, 5: 25, 7: 49, 9: 81}
9. 변수의 생존 범위
Local < Enclosing function > Global
* test08_func
player = '전국대표' # Global Variable
def funcSoccer():
player = '지역대표' # Local Variable
name = '한국인' # Local Variable
print(name, player)
funcSoccer()
# print(name, player) # 지역변수는 해당 블록에서만 사용 가능. Error
global a : 블록 내의 지역변수가 아닌 전역변수를 사용하도록 한다. nonlocal a : 블록 내의 지역변수가 아닌 가까운 함수의 변수를 사용하도록 한다.
a = 10; b = 20; c = 30
print('1) a:{}, b:{}, c:{}'.format(a,b,c))
def Foo():
a = 40
b = 50
def Bar():
#c = 60
global c # 블록 내의 지역변수가 아닌 전역변수를 사용하도록 한다.
nonlocal b # 블록 내의 지역변수가 아닌 가까운 함수의 변수를 사용하도록 한다.
print('2) a:{}, b:{}, c:{}'.format(a,b,c)) # Enclosing function
c = 60 # UnboundLocalError: local variable 'c' referenced before assignment
b = 70
Bar()
Foo()
#Foo().Bar()
print('3) a:{}, b:{}, c:{}'.format(a,b,c))
print()
def func1(*ar):
print(ar)
for i in ar:
print('음식 : ' + i)
func1('비비비')
func1('비비비','이이이','트트트트')
def func2(a, *ar):
#def func2(*ar, a): # TypeError
print(a)
print(ar)
for i in ar:
print('음식 : ' + i)
func2('비비비')
func2('비비비','이이이','트트트트')
re = 0
def selectProcess(choice, *ar):
if choice == '+':
re = 0
for i in ar:
re += i
elif choice == '*':
re = 1
for i in ar:
re *= i
return re
print(selectProcess('+',1,2,3,4,5))
print(selectProcess('*',1,2,3,4,5))
def func3(w, h, **ect):
print('몸무게 {}, 키 {}'.format(w, h))
print(ect)
func3(65, 175, name = '홍길동')
func3(65, 178, name = '고길동', age = 22)
func3(w=80, h=175, name = '김길동')
def CountDown(n):
if n == 0:
print('처리완료')
else:
print(n, end = ' ')
CountDown(n - 1) # 함수가 자신을 호출
CountDown(5) # 5 4 3 2 1 처리완료
def totFunc(su):
if su == 1:
print('처리 끝')
return 1
return su + totFunc(su - 1)
re = totFunc(10)
print('10까지의 합은 : ', re) # 10까지의 합은 : 55
11. 일급함수
: 함수 안에 함수 선언 가능, 인자로 함수 사용, 반환값이 함수 가능
def func1(a, b):
return a + b
func2 = func1 # 함수의 주소를 치환
print(func1(2,3)) # 5
print(func2(2,3)) # 5
def func3(func): # 인자로 함수 사용
def func4(): # 함수 안에 함수 선언 가능
print('내부함수')
func4()
return func # 반환값이 함수 가능
mbc = func3(func1) # func1
print(mbc(3, 4)) # 내부함수 7
- Lambda : 이름이 없는 한 줄짜리 함수 형식 : lambda arg, ... :표현식 => return문 없이 결과 반환
def hap(x, y):
return x + y
print(hap(2, 4)) # 6
aa = lambda x, y: x + y
print(aa(2, 4)) # 6
kbs = lambda a, su = 10: a + su
print(kbs(5)) # 15
print(kbs(5, 6)) # 11
sbs = lambda a, *tu, **di : print(a, tu, di)
sbs(1,2,3,tvn=3, ytn=24) # 1 (2, 3) {'tvn': 3, 'ytn': 24}
li = [lambda a, b:a+b, lambda a, b:a*b]
print(li[0](3,4)) # 7
print(li[1](3,4)) # 12
- 다른 함수에서 인자 값으로 람다를 사용 filter(함수, 집합형 자료) : 자료의 요소 하나씩를 함수에 입력하여 결과값을 집합형으로 출력
: 소스 코드의 재사용을 가능하게 하며, 소스 코드를 하나의 이름 공간으로 구분하고 관리할 수 있다. 멤버 : 일반 명령문, 함수, 모듈, 클래스 하나의 파일로 처리된다. 내장된 표준 모듈, 사용자 정의 모듈, 제 3자 모듈(third party)
* test11_module
- 내장된 표준 모듈(로딩 필요 없음) 일부 사용해 보기 작업 중 외부모듈이 필요한 경우 import 모듈명하여 사용
print(sum([2, 3])) # 내장된 표준모듈
import sys
print('모듈 경로 : ',sys.path)
sys.exit() # 프로그램 강제 종료
print('프로그램 종료')
import math
print(math.pi)# 3.141592653589793
print(math.sin(math.radians(30))) # 0.49999999999999994
import calendar
calendar.setfirstweekday(6) # 첫주 시작을 일요일로 변경
calendar.prmonth(2021,2) # 달력 출력
# February 2021
# Mo Tu We Th Fr Sa Su
# 1 2 3 4 5 6 7
# 8 9 10 11 12 13 14
# 15 16 17 18 19 20 21
# 22 23 24 25 26 27 28
- 난수 출력
import random
print(random.random()) # 난수 출력
print(random.randint(1, 10)) # 1~10 사이의 난수
from random import random
print(random())
from random import randint
from random import *
print(randint(1, 10))
13. 사용자 정의 모듈
* test12_my (동일 패키지)
# 사용자 정의 모듈
tot = 123 # 전역변수
def ListHap(*ar):
print(ar)
if __name__ == "__main__":
print('응용프로그램이 시작되는 모듈')
def kbs():
ch = 9
print('공영방송', ch)
def mbc():
print('문화방송')
* test12_our (다른 패키지)
# 사용자 정의 모듈
def Hap(a, b):
return a + b
def Cha(a, b):
return a - b
* test12_our2 (lib폴더 경로)
# 사용자 정의 모듈
def Gop(a, b):
return a * b
def Nanugi(a, b):
return a / b
* test12_module
# 사용자 정의 모듈
a = 10
print(a)
def aa():
print('aa 출력')
# 외부 모듈의 멤버 사용하기1
import pack2.test12_my # 경로
print('tot : ', pack2.test12_my.tot) # tot : 123
li1 =[1, 2]
li2 =[3, 4]
pack2.test12_my.ListHap(li1, li2)
def abc():
if __name__ == "__main__":
print('응용프로그램이 시작되는 모듈')
abc()
pack2.test12_my.kbs()
print()
# 외부 모듈의 멤버 사용하기2
from pack2 import test12_my
test12_my.mbc()
from pack2.test12_my import mbc
mbc()
from pack2.test12_my import mbc, kbs, tot
mbc()
kbs()
print(tot)
print()
# 외부 모듈의 멤버 사용하기3 - package가 다른 경우
from other.test12_our import Hap, Cha
print(Hap(5, 3)) # 8
print(Cha(5, 3)) # 2
# C:\anaconda3\Lib 경로의 모듈 사용
import test12_our2
print(test12_our2.Gop(5, 3))
print(test12_our2.Nanugi(5, 3))
import math
print(math.pi)
from test12_our2 import Gop
print(Gop(5, 3))
from math import pi
print(pi)
window - Preferences - PyDev - Interpreters - Python Interpreters - Libraries Tab 선택 안의 경로에 추가시 import 할 수 있다.
14. turtle
: Graphic 지원 모듈 사용 - turtle
* test13_graphic
import turtle
from turtle import *
pen = Pen()
pen.color('red', 'yellow')
pen.begin_fill()
while True:
pen.forward(200)
pen.left(170)
if abs(pen.pos()) < 1:
break
pen.end_fill()
done()
15. 외부 모듈 사용
* test14
① http://www.lfd.uci.edu/~gohlke/pythonlibs/ 사이트에서 모듈 다운로드하여 lib경로에 설치
② 시작 - anconda prompt - pip install pygame
import pygame
16. Class
: OOP 기법 구사 : 클래스는 새로운 이름 공간을 지원하는 단위. 멤버는 변수, 메소드, 생성자로 구성. 접근 지정자X, 메소드 오버로딩X
* test15_class
print('do')
def func():
print('함수')
class TestClass: # 원형 클래스 - prototype (객체가 실행과 동시에 생성. new 미사용)
abc = 1 # 멤버변수(전역변수)
def __init__(self):
print('생성자')
def __del__(self):
print('소멸자')
def printMsg(self): # 메소드
name = '홍길동'
print(name)
print(self.abc)
self.show()
def show(self):
print('show')
print(TestClass.abc) # 원형 클래스의 멤버 변수 호출
TestClass.printMsg(self) # NameError: name 'self' is not defined
test = TestClass() # 생성자 호출된 후 객체 생성(instance)
# 생성자
print(test.abc) # 1
test.printMsg() # 1. Bound method call
# 홍길동 1 show
TestClass.printMsg(test) # 2. UnBound Method call
# 홍길동 1 show
# method
print('car1 - ', car1.showData()) # car1 - 속도 : 10 킬로미터
print('car2 - ', car2.showData()) # car2 - 속도 : 30 킬로미터
car1.speed = 100
car2.speed = 200
print('car1 - ', car1.showData()) # car1 - 속도 : 100 킬로미터
print('car2 - ', car2.showData()) # car2 - 속도 : 200 킬로미터
print(Car.speed) # 0
print(car1.speed) # 100
print(car2.speed) # 200
print(Car.color) # AttributeError: type object 'Car' has no attribute 'color'
print(car1.color) # 핑크
print(car2.color) # AttributeError: type object 'Car' has no attribute 'color'
* test17_class
kor = 100 # 모듈의 전역변수
def abc():
print('모듈의 멤버 함수')
class MyClass:
kor = 88
"""
def __init__(self): # 기본 생성
pass
"""
def abc(self):
print('클래스의 멤버 메소드')
def showData(self):
print(kor) # 메소드 내에서 없을 경우 모듈의 전역변수를 찾는다.
print(self.kor)
self.abc() # 현재 클래스 내의 메소드 콜
abc() # 모듈의 함수 콜
obj = MyClass()
obj.showData()
# 100
# 88
# 클래스의 멤버 메소드
# 모듈의 멤버 함수
# 클래스 = 설계도
# Singer가 갖추어야 할 기본 속성, 행위를 설계도(원형클래스)로 만든 후 모든 가수들은 Singer type으로 존재하면 됨
class Singer:
title_song ='노래제목' # 멤버 변수
def __init__(self):
pass
def sing(self):
msg = '노래는'
print(msg, self.title_song)
# 편의 상 아래에서 객체를 만들지만 별도의 모듈에서 Singer를 호출하여 사용하는 것이 일반적
bts = Singer()
bts.sing() # 노래는 노래제목
bts.title_song = '다이너마이트'
bts.sing() # 노래는 다이너마이트
bts.co = '빅히트'
print('소속사 :', bts.co) # 소속사 : 빅히트
* test18_class2
# 클래스 연습
print('do')
a = 10
def aa():
print(a)
# 새로운 가수 타입의 객체 필요
import pack2.test18_class
print('-----------------')
twice = pack2.test18_class.Singer()
twice.sing() # 노래는 노래제목
twice.title_song = '우아하게'
twice.sing() # 노래는 우아하게
print('소속사 :', twice.co) # error
17. 포함관계 (has a 관계)
* test19_handle
# 움직이는 기계에 사용할 부품 클래스
class PohamHandle:
quantity = 0 # 회전량
def LeftTurn(self, quantify):
self.quantity = quantify
return '좌회전'
def RightTurn(self, quantify):
self.quantity = quantify
return '우회전'
* test19_car
# Car 클래스 : 여러개의 부품(클래스)을 조립해서 완성된 차를 생성
class PohamCar:
speed = 0
turnShow = '정지'
def __init__(self, ownerName): # ownerName 인스턴트에만 존재. 원형클래스에는 없음
self.owerName = ownerName
self.handle = PohamHandle() # 클래스의 포함 관계
def TurnHandle(self, q): # PohamCar 메소드로 핸들을 움직이는 행위
if q > 0:
self.turnShow = self.handle.RightTurn(q)
elif q < 0:
self.turnShow = self.handle.LeftTurn(q)
elif q == 0:
self.turnShow = '직진'
if __name__ == '__main__':
tom = PohamCar('톰')
tom.TurnHandle(10)
print(tom.owerName+'의 회전량은 ' + tom.turnShow + str(tom.handle.quantity)) # 톰의 회전량은 우회전10
tom.TurnHandle(0)
print(tom.owerName+'의 회전량은 ' + tom.turnShow) # 톰의 회전량은 우회전10
print()
oscar = PohamCar('오스카')
oscar.TurnHandle(-5)
print(oscar.owerName+'의 회전량은 ' + oscar.turnShow + str(oscar.handle.quantity))
# 오스카의 회전량은 좌회전-5
* test20_has_a
- 냉장고(class)에 음식(class)을 저장
class FoodData:
def __init__(self, name, expiry):
self.name = name
self.expiry = expiry
class Fridge:
isOpend = False # 냉장고 문 개폐 여부
foods = [] # 리스트
def open(self):
self.isOpend = True
print('냉장고 문이 열렸습니다.')
def close(self):
self.isOpend = False
print('냉장고 문이 닫혔습니다.')
def put(self, thing):
if self.isOpend == True:
self.foods.append(thing) # 클래스의 포함
print('냉장고에 음식을 저장하였습니다.')
self.listFood()
else:
print('냉장고 문이 닫혀있어 음식을 담을 수 없습니다.')
def listFood(self):
for f in self.foods:
print('-', f.name, f.expiry)
f = Fridge()
apple = FoodData('사과', '2021-3-5')
f.put(apple) # 냉장고 문이 닫혀있어 음식을 담을 수 없습니다.
f.open() # 냉장고 문이 열렸습니다.
f.put(apple) # 냉장고에 음식을 저장하였습니다.
# - 사과 2021-3-5
f.close() # 냉장고 문이 닫혔습니다.
cola = FoodData('콜라', '2022-12-5')
f.open() # 냉장고 문이 열렸습니다.
f.put(cola) # 냉장고에 음식을 저장하였습니다.
# - 사과 2021-3-5
# - 콜라 2022-12-5
f.close() # 냉장고 문이 닫혔습니다.
18. 상속
: 클래스가 다른 클래스의 멤버를 활용 - 상속 : 다형성을 구사
* test21_inherit
class Animal: # 별도의 모듈에서 작성하고 호출하였다고 가정
age = 0
def __init__(self):
print('Animal 생성자')
def move(self):
print('움직이는 생물')
class Dog(Animal): # 상속
age = 10
def __init__(self):
print('Dog 생성자')
def dogShow(self):
age = 2
print('개')
print('age :', age) # 지역변수
print('age :', self.age) # 클래스 -> 부모
print('age :', super().age) # 부모
dog1 = Dog() # 자식 생성자가 있을 경우 자식 생성자만 수행
# 자식 생성자가 없을 경우 부모 생성자가 수행
print('dog1.age :',dog1.age) # dog1.age : 0
dog1.move() # 움직이는 생물
dog1.dogShow()
# 개
# age : 2
# age : 10
# age : 0
class Horse(Animal):
pass
horse = Horse()
horse.move()
클래스 상속 연습
* test22_inherit
class Person:
say = '사람'
age = 20
__kbs = '공영방송' # __변수명 : private 멤버 - 현재 클래스에서만 호출 가능
def __init__(self, age):
print('Person 생성자')
self.age = age
def printInfo(self):
print('나이 :{}, 이야기:{}'.format(self.age, self.say))
def hello(self):
print('hello')
print('hello : ', self.say, self.__kbs)
pe = Person(22) # Person 생성자
pe.printInfo() # 나이 :22, 이야기:사람
pe.hello()
# hello
# hello : 사람 공영방송
class Employee(Person):
say = "직원" # 자식과 동일한 멤버변수에 의해 부모의 say가 숨겨짐
subject = '근로자' # Employee 고유 멤버 변수
def __init__(self):
print("Employee 생성자")
def printInfo(self): # 자식과 동일한 메소드에 의해 부모의 메소드가 숨겨짐. 메소드 오버라이드
print('Employee printInfo 메소드')
def empShow(self):
say = "empShow"
print(say)
print(self.say)
self.printInfo() # 자식 -> 부모
super().printInfo() # 부모
emp = Employee() # Employee 생성자
print(emp.say, emp.age) # 직원 20
print(emp.subject) # 근로자
emp.printInfo()
# 나이 :20, 이야기:직원
# Employee printInfo 메소드
emp.empShow()
# empShow
# 직원
# Employee printInfo 메소드
# 나이 :20, 이야기:직원
class Worker(Person):
pass
wo = Worker(33) # Person 생성자
print(wo.say, wo.age) # 사람 33
wo.printInfo() # 나이 :33, 이야기:사람
class Worker(Person):
hobby = '코딩'
def __init__(self, age):
print('Worker 생성자')
#super().__init__(age) # 부모의 생성자 호출. Bound call
Person.__init__(self, age) # UnBound call
def woShow(self):
self.printInfo()
super().printInfo()
wo = Worker(27)
# Worker 생성자
# Person 생성자
wo.woShow()
# 나이 :27, 이야기:사람
# 나이 :27, 이야기:사람
class Programmer(Worker):
def __init__(self, age):
print('Programmer 생성자')
Worker.__init__(self, age)
def prShow(self):
self.printInfo()
super().printInfo()
def kbsShow(self):
print(self.say)
#print(self.__kbs) # AttributeError: 'Programmer' object has no attribute '_Programmer__kbs'
pr = Programmer(25)
# Programmer 생성자
# Worker 생성자
# Person 생성자
print(pr.say, pr.age) # 사람 25
pr.prShow()
# 나이 :25, 이야기:사람
# 나이 :25, 이야기:사람
pr.hello()
# hello
# hello : 사람 공영방송
pr.kbsShow()
# 클래스 타입확인
a = 3
print(type(a)) # int
print(type(pr)) # __main__.Programmer
print(Programmer.__bases__) # 부모클래스 확인. __main__.Worker
print(Worker.__bases__) # __main__.Person
print(Person.__bases__) # object
19. 메소드 오버라이딩
: 부모 클래스의 메소드와 동일한 이름의 메소드를 자식 클래스에서 만듦(재정의) 다형성의 근거를 제시
# 다형성
par = Parent()
par = c1 # 자식객체의 주소를 치환
par.printData() # 30 출력
par.displayData() # Parent의 displayData
print()
par = c2 # 자식객체의 주소를 치환
par.printData() # Child2 printData
par.displayData() # Child2 displayData
par.c2method() # 오버라이딩 하지않은 메소드도 호출 가능
print()
# 자바와 파이썬 차이
sbs = c1 # 주소 치환시 같은 타입이 아니더라도 객체 및 메소드 사용가능
sbs.printData()
sbs.displayData()
print()
sbs = c2
sbs.printData()
sbs.displayData()
sbs.c2method()
print()
plist = [c1, c2]
for i in plist:
i.printData()
print('aa\tbb')
print('aa\nbb')
print('c:\aa\nbc\cc.txt')
print(r'c:\aa\nbc\cc.txt') # r'' : 이스케이프 문자로 해석하지않음.
format()
print(format(1.5678, '10.3f'))
print('나는 나이가 %d 이다.'%23)
print('나는 나이가 %s 이다.'%'스물셋')
print('나는 나이가 %d 이고 이름은 %s이다.'%(23, '홍길동'))
print('나는 나이가 %s 이고 이름은 %s이다.'%(23, '홍길동'))
print('나는 키가 %f이고, 에너지가 %d%%.'%(177.7, 100))
print('이름은 {0}, 나이는 {1}'.format('한국인', 33))
print('이름은 {}, 나이는 {}'.format('신선해', 33))
print('이름은 {1}, 나이는 {0}'.format(34, '강나루'))
name = ['홍길동', '김길동', '이길동']
if '홍길동2' in name:
print('freind')
else:
print('dont know')
- 한줄 if else
(참일때 출력문) if (조건) else (거짓일때 출력문)
a = 'kbs'
b = 9 if a == 'kbs' else 11
print(b)
a = 11
b = 'mbc' if a == 9 else 'kbs'
print(b)
(참일때 출력문, 거짓일때 출력문) [조건]
a = 3
result = 0
if a > 5:
result = a * 2
else :
result = a + 2
print(result) # 5
result = a * 2 if a > 5 else a + 2
print(result) # 5
print((a + 2, a* 2)[a > 5]) # 5
print(int(True), int(False)) # 1 0
6. 반복문 while
* test5_while
a = 1
while a <= 5:
print(a, end = ' ')
a += 1
# 1 2 3 4 5
print('\na: ', a) # a: 6
i = 1; sum = 0;
while i <= 100:
if i % 3 == 0:
sum += i
i += 1
print('합은 '+str(sum)) # 합은 1683
str1.pop() : str1에서 가장 마지막 값 방출
colors = ['r', 'g', 'b']
print(colors)
print(colors[1])
a = 0
while a < len(colors):
print(colors[a], end = ' ') # r g b
a += 1
while colors:
print(colors.pop(), end = ' ') # b g r. LIFO
- 별찍기
i = 0
while i <= 10:
j = 1
re = ' '
while j <= i:
re = re + '*'
j = j + 1
print(re)
i = i + 1
# *
# **
# ***
# ****
# *****
# ******
# *******
# ********
# *********
# **********
i = 0
while i <= 10:
j = 1
re = ' '
while j <= i:
re = re + ' '
j = j + 1
k = 1
while k <= 11 - j:
re = re + '*'
k = k + 1
print(re)
i = i + 1
# **********
# *********
# ********
# *******
# ******
# *****
# ****
# ***
# **
# *
- if 블럭 내에 while 블럭 사용
import time
time.sleep(1) : sleep
import time
sw = input('폭탄 스위치를 누를까요?[y/n]')
if sw == 'Y' or sw == 'y':
count = 5
while 1 <= count:
print('%d 초 남음'%count)
time.sleep(1)
count -= 1
print('boom!')
elif sw == 'N' or sw == 'n':
print('작업취소')
else:
print('y 또는 n을 누르시오')
* test5_while2
- continue, break
a = 0
while a < 10:
a += 1
if a == 5:continue
if a == 7:break
print(a, end=' ')
else: # phython만 존재
print('while 정상 수행') # while문 정상 완료 후 1회 수행. break 실행시 출력되지않음
# 1 2 3 4 6
print('while 수행 후 %d'%a) # while 수행 후 7
- 홀수, 짝수 확인
while True:
a = int(input('숫자입력:'))
if a == 0:
print('while문을 빠져나갑니다.')
break
elif a % 2 == 0: # 짝수
print('%d는 짝수'%a)
elif a % 2 == 1: # 홀수
print('%d는 홀수'%a)
7. 반복문 for
* test6_for
for i in [1, 2, 3, 4, 5]: # list :
print(i, end = ' ')
# 1 2 3 4 5
print()
for i in (1, 2, 3, 4, 5): # tuple
print(i, end = ' ')
# 1 2 3 4 5
print()
for i in {1, 2, 3, 4, 5, 5, 5}: # set
print(i, end = ' ')
# 1 2 3 4 5
str.items() : tuple로 key, value 리턴
sort = {'java':'웹용', 'python':'만능언어','java script':'컨텐츠 제작용'}
for i in sort.items(): # str.items() : tuple로 리턴
print(i)
print(i[0] + '- '+i[1])
# ('java', '웹용')
# java- 웹용
# ...
for k, v in sort.items():
print(k)
print(v)
# java
# 웹용
# python
# 만능언어
# java script
# 컨텐츠 제작용
- str.values() : value값 리턴
for k in sort.values():
print(k, end = ' ')
# 웹용 만능언어 컨텐츠 제작용
- 2, 3단 출력
for n in [2 ,3]:
print('--{}단--'.format(n))
for su in [1,2,3,4,5,6,7,8,9]:
print('{0} * {1} = {2}'.format(n, su, n*su), end = '\t')
print()
enumerate(a) : index와 요소값 리턴
li = ['a', 'b', 'c']
li = ('a', 'b', 'c')
li = {'a', 'b', 'c'} # 순서 없음. 무작위
for ind, data in enumerate(li):
print(ind, data)
# 0 a
# 1 b
# 2 c
- continue, break
datas = [1,2,3,4,5]
for i in datas:
if i == 3:
continue
if i == 5:
break
print(i, end = ' ')
else:
print('정상 처리') # break 실행시 출력되지않음
- for문 내부에 if문 사용
score = [95,70,60,50,100]
num = 0
for j in score:
num += 1
if j < 70: continue
print('%d번째 점수는 합격'%num)
# 1번째 점수는 합격
# 2번째 점수는 합격
# 5번째 점수는 합격
- 이중 for문
li1 = [3,4,5]
li2 = [0.5,1,2]
for a in li1:
for b in li2:
print(a + b, end = ' ') # 3.5 4 5 4.5 5 6 5.5 6 7
[실행문 for 변수1 in list1 for 변수2 in list2] : list1의 첫번째 요소와 list2의 첫번째 요소 실행문 실행 -> list1의 두번째 요소와 list2의 첫번째 요소 실행문 실행 -> ...
print([a + b for a in li1 for b in li2])
datas = [a + b for a in li1 for b in li2]
for d in datas:
print(d, end = ' ') # 3.5 4 5 4.5 5 6 5.5 6 7
- 정규 표현식
re.sub(r"[^가-힣\s]", "", ss) : ss에서 패턴과 일치는 값을 ""로 대체
import re
ss = '''
이재명 경기도지사는 8일 일각에서 제기되는 탈당설에 대해 “민주당 지지자들이 압도적으로 응원하는데 왜 나가느냐”고 강력 부인했다.
이 지사는 이날 OBS 방송에 출연해 ‘일부에서 탈당설이 제기되고 있다’는 질문에 “2005년부터 16년간 민주당 당원인데 왜 탈당하느냐”면서 이같이 반문했다.
이 지사는 이날 OBS 방송에 출연해 ‘일부에서 탈당설이 제기되고 있다’는 질문에 “2005년부터 16년간 민주당 당원인데 왜 탈당하느냐”면서 이같이 반문했다.
이 지사는 이날 OBS 방송에 출연해 ‘일부에서 탈당설이 제기되고 있다’는 질문에 “2005년부터 16년간 민주당 당원인데 왜 탈당하느냐”면서 이같이 반문했다.
아울러 이 지사는 ‘정세균 총리 이외에도 당내 제3후보론이 나오는데 섭섭하지 않으냐’는 질문에는 “저는 안 섭섭하다. 섭섭할 사람은 (대선주자 선호도) 2등 하시는 분일 것”이라며
이 지사는 이날 OBS 방송에 출연해 ‘일부에서 탈당설이 제기되고 있다’는 질문에 “2005년부터 16년간 민주당 당원인데 왜 탈당하느냐”면서 이같이 반문했다.
이 지사는 이날 OBS 방송에 출연해 ‘일부에서 탈당설이 제기되고 있다’는 질문에 “2005년부터 16년간 민주당 당원인데 왜 탈당하느냐”면서 이같이 반문했다.
“저는 누군가는 상대해야 하는데, 저보다는 대체 당할 수 있는 분이 억울할 것”이라고 했다.
'''
ss2 = re.sub(r"[^가-힣\s]", "", ss) # 한글만 parsing
print(ss2)
ss3 = ss2.split(' ') # 공백 기준 단어를 나눔
print(ss3)
cnt = {} # 단어의 발생횟수를 dict로 저장
for n in ss3:
if n in cnt: # count있을 경우 ++
cnt[n] += 1
else:# 없을 경우 1
cnt[n] = 1
print(cnt)
# {'\n이재명': 1, '경기도지사는': 1, '일': 1, '일각에서': 1, '제기되는': 1, '탈당설에': 1, '대해': 1, '민주당': 6, '지지자들이': 1, '압도적으로': 1, '응원하는데': 1, '왜': 6, '나가느냐고': 1, '강력': 1, '부인했다\n이': 1, '지사는': 6, '이날': 5, '': 5, '방송에': 5, '출연해': 5, '일부에서': 5, '탈당설이': 5, '제기되고': 5, '있다는': 5, '질문에': 5, '년부터': 5, '년간': 5, '당원인데': 5, '탈당하느냐면서': 5, '이같이': 5, '반문했다\n이': 3, '반문했다\n아울러': 1, '이': 1, '정세균': 1, '총리': 1, '이외에도': 1, '당내': 1, '제후보론이': 1, '나오는데': 1, '섭섭하지': 1, '않으냐는': 1, '질문에는': 1, '저는': 1, '안': 1, '섭섭하다': 1, '섭섭할': 1, '사람은': 1, '대선주자': 1, '선호도': 1, '등': 1, '하시는': 1, '분일': 1, '것이라며\n이': 1, '반문했다': 1, '\n저는': 1, '누군가는': 1, '상대해야': 1, '하는데': 1, '저보다는': 1, '대체': 1, '당할': 1, '수': 1, '있는': 1, '분이': 1, '억울할': 1, '것이라고': 1, '했다\n': 1}
for i in range(6):
print(i, end = ' ') # 0 1 2 3 4 5
print()
tot = 0
for i in range(1, 50, 2):
print(i, end = ' ') # 1 3 5 7 9 11 13 15 17 19 21 23 25 27 29 31 33 35 37 39 41 43 45 47 49
tot += i
print()
print('결과는 ' + str(tot))
print('결과는 ' + str(sum(range(1, 50, 2))))
- 구구단 2~5단
for i in range(2, 5):
for j in range(1, 9):
print('{0} * {1} = {2}'.format(i,j,i*j), end = '\t')
print()
- 1 ~ 100 사이의 숫자 중 3의 배수이면서 5의 배수인 수들의 합 출력
tot = 0
for i in range(1, 101):
#print(i, end = ' ')
if i % 3 == 0 and i % 5 == 0:
tot = tot + i
print('합은', tot) # 합은 315
- N - gram : 문자열에서 n개의 연속된 요소를 추출하는 방법 - 글자별 n-gram : 2- gram
ss = 'hello'
for i in range(len(ss) -1):
print(ss[i], ss[i+ 1], sep = ' ')
# h e
# e l
# l l
# l o
- 단어별 n-gram : 2- gram
ss2 = 'this is python script'
words = ss2.split()
for i in range(len(words) -1):
print(words[i], words[i+ 1], sep = ' ')
# this is
# is python
# python script
"{0}{1}".format(a,b) => "ab"
"{0}{a}".format(c,a=1) => "c1"
"{0:<3}".format(a) => "a " 왼쪽 정렬 및 공백추가
"{0:>3}".format(a) => " a" 오른쪽 정렬 및 공백추가
"{0:^3}".format(a) => " a " 가운데 정렬 및 공백추가
"{0:=^3".format(a) => "=a=" 공백 =로 채우기
"{0:!^3".format(a) => "=a=" 공백 !로 채우기
"{0:6.2f}.format(1.23) => " 1.23"
"{{}}".format() => "{}"
10) 함수
a.count('b') # 문자열 a에서 'b' 문자 개수 리턴
a.find('b') => a문자열에서 처음 나온 'b'문자 위치 리턴. 0부터 시작. 없으면 -1 리턴
a.index('b') => a문자열에서 처음 나온 'b'문자 위치 리턴. 0부터 시작. 없으면 error
a.join('abcd') => a=.이면 'abcd'문자 사이에 . 포함하여 리턴. 'a.b.c.d'
a.upper() => a문자열 대문자로 변경하여 리턴.
a.lower() => a문자열 소문자로 변경하여 리턴.
a.lstrip() => a문자열에서 왼쪽 공백 제거하여 리턴.
a.rstrip() => a문자열에서 오른쪽 공백 제거하여 리턴.
a.strip() => a문자열에서 양쪽 공백 제거하여 리턴.
a.replace(바뀌게 될 문자열b, 바꿀 문자열c) => a문자열에 존재하는 b문자열을 c문자열로 변경하여 리턴.
a.split() => a문자열에 공백 기준으로 문자를 나눠 리스트로 반환. a="a b c" => a.split() => ['a','b','c']
a.split('기준문자') => a문자열에 '기준문자'를 기준으로 문자를 나눠 리스트로 반환. a="a;b;c" => a.split(';') => ['a','b','c']
* str(a) => 정수 or 실수인 a를 형변환 하여 문자열로 변경한다.["1","2"]
5) 값 변경 a=[1,2,3] a[1]=4 => a=[1,4,3]
a=[1,2,3] a[1:2]=[4,5,6] => a=[1,4,5,6,3]
a=[1,2,3] a[1]=[4,5,6] => a=[1,[4,5,6],3]
6) 값 삭제 a[1:2] = []
del a[1]
* del 객체 : 객체 삭제
7) 함수
a.append(b) : a의 마지막에 b 추가. a에 변경 값을 넣는다.
a=[1,2,3]
a.append(4) => a=[1,2,3,4]
a=[1,2,3]
a.append([4,5]) => a=[1,2,3,[4,5]]
a.sort() => a를 오름 차순 정렬하여 a에 변경 값을 넣는다.
a = sorted(a, reverse=True)
a.reverse() => a의 순서를 반대로 뒤집어 a에 변경 값을 넣는다.
a.index(3) => a의 3의 위치를 리턴. 0부터 시작. 값이 없으면 error 발생.
a.insert(b,c) => a의 b번째 위치에 c를 삽입하여 리턴.
a.remove(b) => a에서 첫번째 나오는 b 삭제하여 리턴.
a.pop() => a의 마지막 요소 리턴. 마지막 요소 삭제하여 그 값을 a에 넣는다.
a.pop(b) => a의 b위치의 값 리턴. b위치 값 삭제하여 그 값을 a에 넣는다.
a.count(b) => a에서 b 개수 리턴.
a.expend(리스트) => a에 리스트를 더한다.
for 변수 in 리스트:
range(10) : 0 ~ 9
range(1, 10) : 1~10
len(a)
result = [num * 3 for num in a if num%2 ==0]
21. 함수
def sum(a, b):
return a+b
return a,b # (a,b)
def sum(a, b = 1) # 맨마지막 자리만 가능
global a = 0
a = input("~")
print(,) # 띄어쓰기
print(i, end = ' ')
f = open("name.txt",'w') # 'r', 'a'
f.close
line = f.readline() # 첫줄 출력
lines = f.readlines() # 리스트 리턴
data = f.read() # 전체 내용
with open("a.txt", "w") as f:
f.write("")
22. 클래스
class Service:
def sum(self, a, b):
self.a = a
def __init__(self, name):
self.name = name
# 인스턴스 생성 시 실행
pey = Service('0')
매서드 오버라이딩 : 이름은 같으나 인자 타입이나 개수가 다른 함수를 생성
상속 : class 자식(부모):
연산자 오버로딩 : def __add__(self, other):
__sub__
__mul__
__truediv__
23. 모듈
import mod1
mod1.sum(1,2)
from mod1 import sum, div
sum(1,2)
from mod1 import*
if __name__ == "__main__" # import시 실행안됨
python mod1.py # 직접 실행시 실행됨
set PYTHONPATH = C:\Python\aa
24. 패키지
__init__.py : 해당 디렉터리가 패키지 일부임 알려줌
__all__ : __all__ = ['파일명']
from .. graphic.render import render_test
import pickle
pickle.dump(data, f)
data = pickle.load(f)
import os
os.environ
os.chdir("경로") : 디렉토리 변경
os.getcwd() : 현재 디렉토리
os.system("명령어") : 시스템 명령어 실행
os.popen("명령어") : 읽기모드로 파일객체 리턴
os.mkdir(디렉토리) : 디렉 생성
os.rmdir(디렉토리) : 디렉 삭제
os.unlink(파일이름) : 파일삭제
os.rename(src, dst) : 파일명 src -> dst로 변경
m = p.match("") : none or m
m = p.search("") : 아닌게 있어도
result = p.findall("") : List 리턴
result = p.finditer("") : 반복가능 객체
m.group() : 문자열
m.start() : 시작위치
m.end() : 끝위치
m.span() : 시작 끝, 튜플
m = re.match('형식', "문자열")
re.DOTALL S \n
re.IGNORECASE I 각 라인 ^p, p$, space 가능, 주석 가능
re.MUKTILINE M
re.VERBOSE X
p = re.complie('형식', re.option)
^p : 처음 p
p$ : 마지막 p
\\ : \
\\\\ : \\
r'\\' : \\
소모가 없는 메타문자
| or
^ 처음
$ 끝
\A ^
\z $
\b 구분자(space) 있어야함
\B 구분자(space) 없어야함
[^] \^
re.M 적용X
29. Group : 문자열이 계속 반복되는 지 조사
(ABC)+ (\w+) (\d+)
group(0) : 전체
group(n) : n번째
\1 : 동일단어 연속
\2 : 두번째 그룹
(?P<name> ) (?p=name)
(?=...)
(?!...)
p = re.compile('a')
p.sub('b', 'c' count=n) : c에서 a를 b로 변경
p.subn( )
('결과', n번 바꿈)
\g<그룹명> 정규식 그룹명 참조
\g<|>
Greedy
30. Element Tree
from xml.etree.ElementTree import parse, ElementTree, SubElement, Element, dump
Tag = Element("Tag") => <Tag></Tag>
Tag.text = "내용1"
SubElement(Tag, "subTag").text = "내용2"
<Tag>내용1
<subTag>내용2</subTag>
</Tag>
Tag.insert(1, sub2Tag)
Tag.remove(1, sub2Tag)
Tag.attrib["속성"] = "속성내용"
Tag.Element("Tag", 속성명 = "속성내용")
indent(Tag)
ElementTree(Tag).write("파일명")
tree = parse("파일명")
note = tree.getroot()
note.get("검색어", "default")
note.keys()
note.item()
note.find("subTag") : 첫번째 태그
note.findall("subTag") : 모든 태그
note.findtext("subTag") : 모든 태그의 Text
note.getiterator()
note.getchildren()
# 알고리즘 수행시간 측정 (보통 1초 128MB)
import time
start_time=time.time()
end_time=time.time()
print("수행시간: ",end_time-start_time)
#단축키
ctrl +/ => 주석
pypy3
* ord('문자') : 아스키코드값 리턴
* stack : pop(), append() 사용
* queue : queue = deque() / queue.popleft(), append()
* array[::-1] : 처음 부터 끝까지 역순으로 한칸씩
* array[A:B:C] : A부터 B까지 C 간격으로
1. 그리디 greedy
2. 구현 implementation
3. 탐색
4. 정렬 sorting
1) 선택 정렬
* swap
array[i],array[j] = array[j],array[i]
2) 삽입 정렬
* range(a,b,1) : a ~ (b-1)까지 1간격
* range(a,b,-1) : a ~(b+1)까지 -1간격
3) 퀵 정렬
* print(a,end=' ') : a 끝에 ' '문자 출력
Add Anaconda3 to my PATH environment variable Uncheck
② PyDev 설치
eclipse - help - eclipse market place - PyDev 검색 - install
general - workspace / Web - CSS/HTML/JSP에서 UTF-8로 변경
Window - Preferences - PyDev - Interpreters - Phython InterPreter - Browse for python/pypy.exe - C:\anaconda3\Phython.exe 선택 - apply
③ 가상환경 설치 시작 - anaconda - anaconda prompt 실행 conda create --name test python=3.7 anaconda 입력 가상환경 활성화 명령 : activate test 가상환경 비활성화 명령 :conda deactivate test